Sign in
Trips Happen
Free, no in-app purchases, no email address required, no mailing lists, no ads, full functionality without registration.
What is it?
This is a very useful application for travelers and those who go on business trips. Really.
Do you need it?
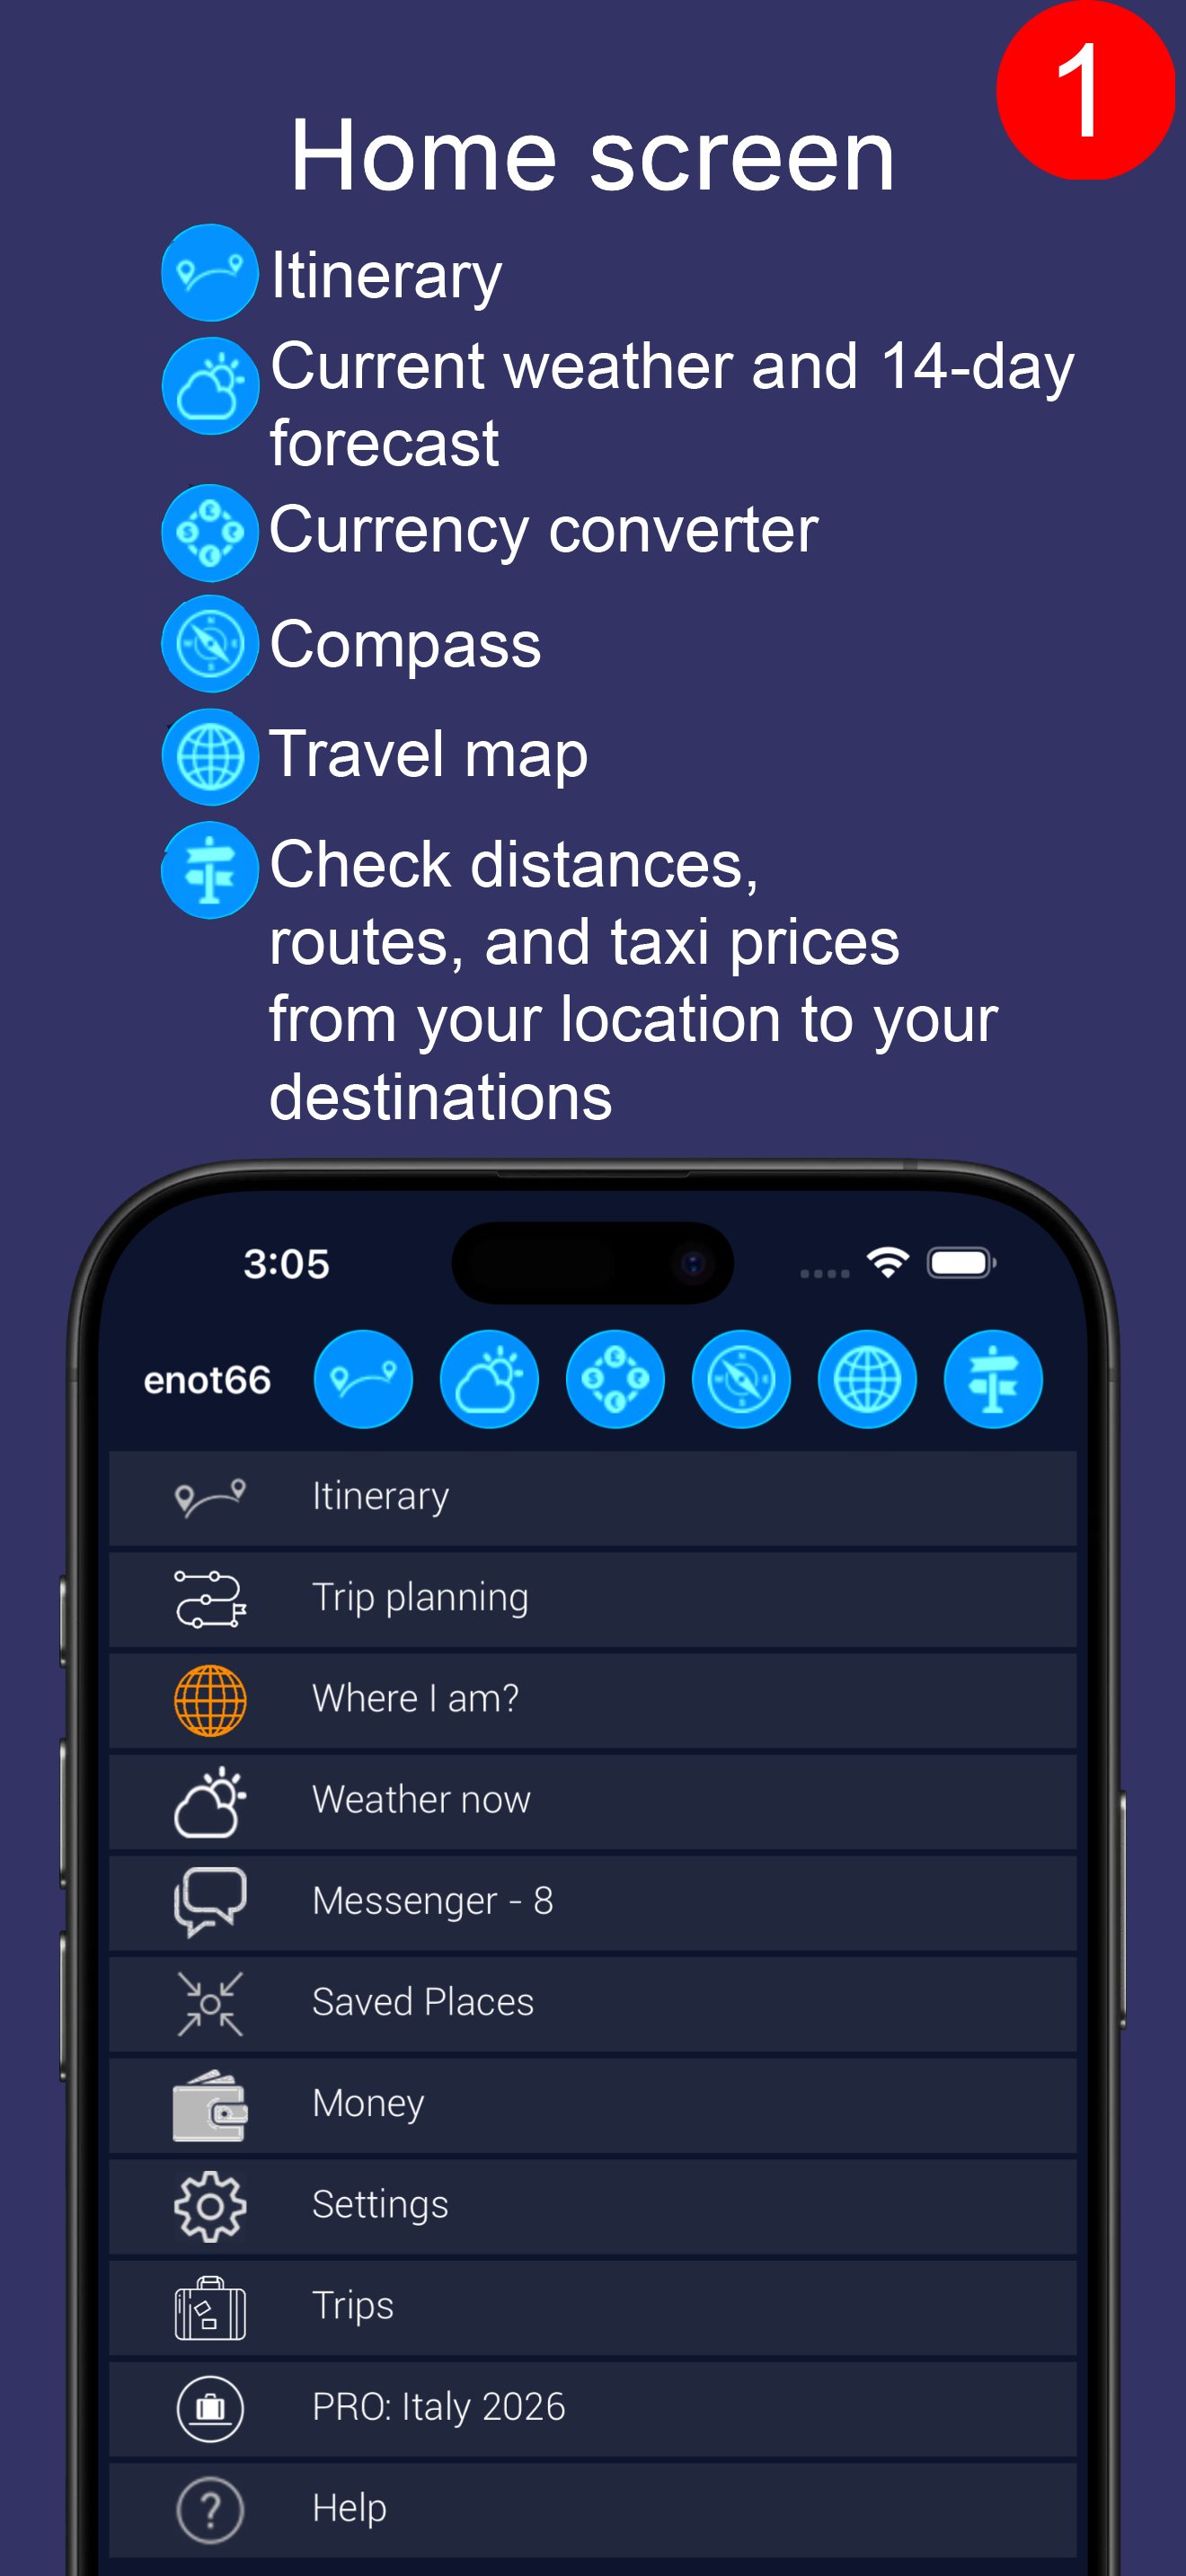
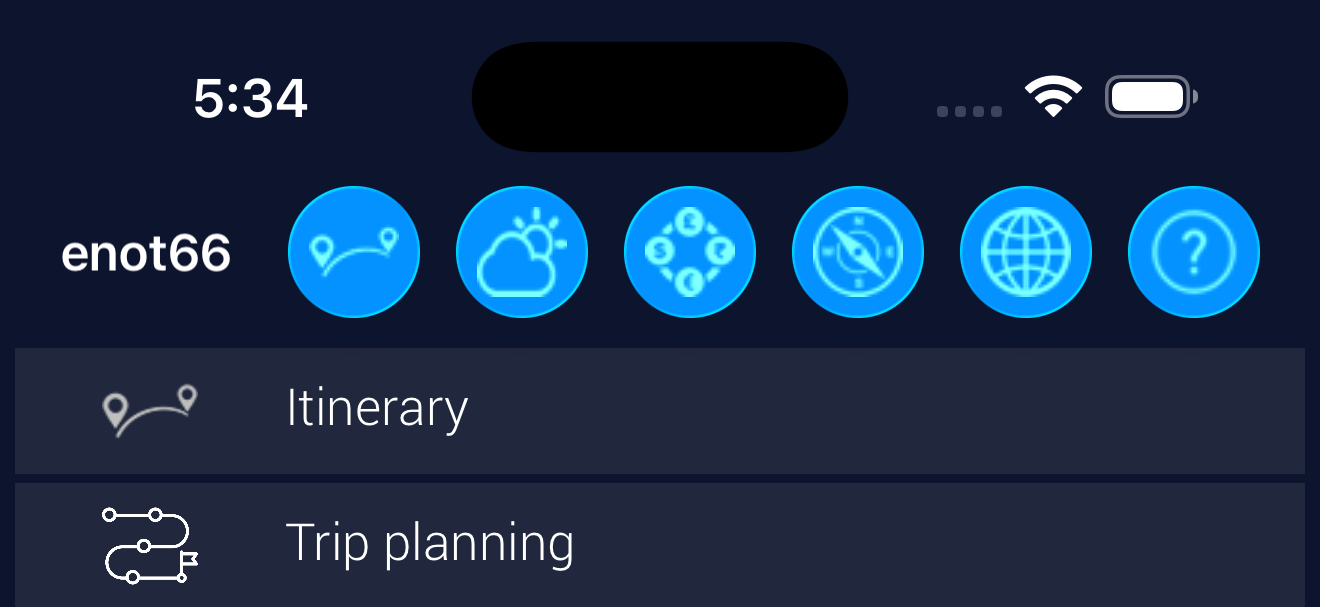
Let's start with the main screen.
On the toolbar - quick access buttons:
 |
Overall travel plan |
| Today's weather and a 14-day forecast for your current location. | |
 |
Currency converter |
 |
Compass |
| Travel map centered on your current location. The map helps you understand the geography of your trip. | |
 |
Routes - this is checking distances, routes, time, and taxi cost from you to the travel objects. |
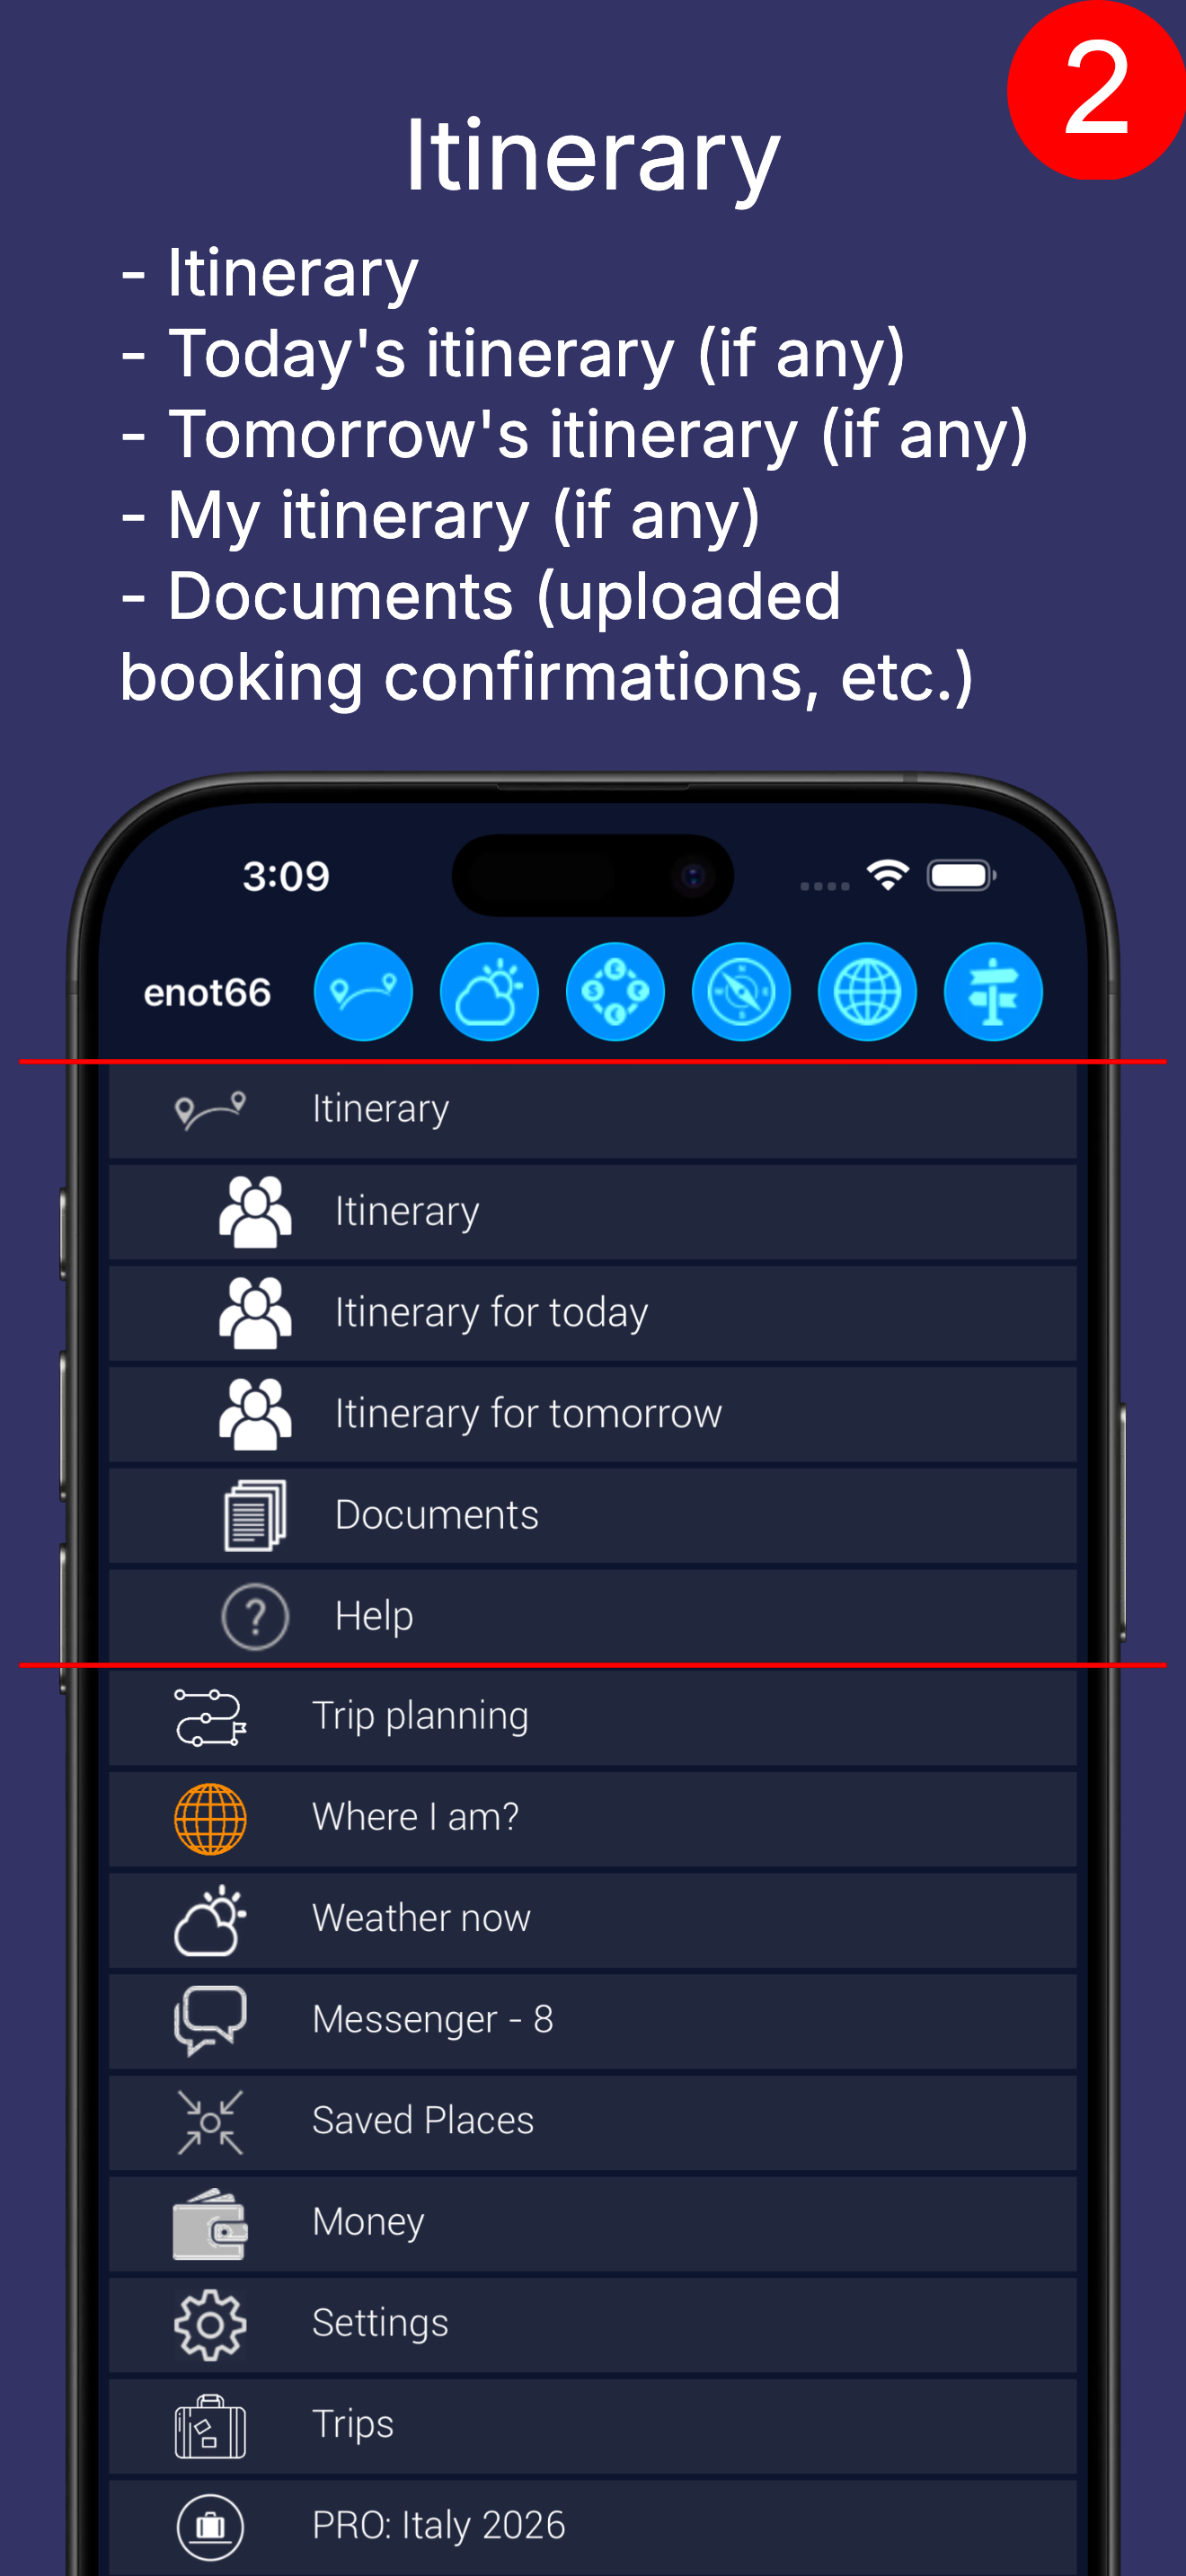
Travel plan.
You can view the entire plan, today's plan, tomorrow's plan, personal plans (if any). And documents, if you uploaded them (for example, booking confirmations).
When people go on business trips, it often happens that their itineraries don't match 100%. For example, one person flies from Rome and another from Milan.
If you don't create personal plans, everyone's plan will include both their own flight and the other person's flight.
If you don't need that, on the travel plan screen (below) tap on the flight, on the flight description screen select "Edit" from the menu, and set the flight participants.
After that, you will get additional items "Plan (Me)", "Today's Plan (Me)", "Tomorrow's Plan (Me)" (if available). The overall plan will contain both flights, while "Plan (Me)" will only show yours.
If no one is set or everyone is set, the app considers that everyone is flying. Obviously, this applies to any travel object - hotels, attractions, etc.
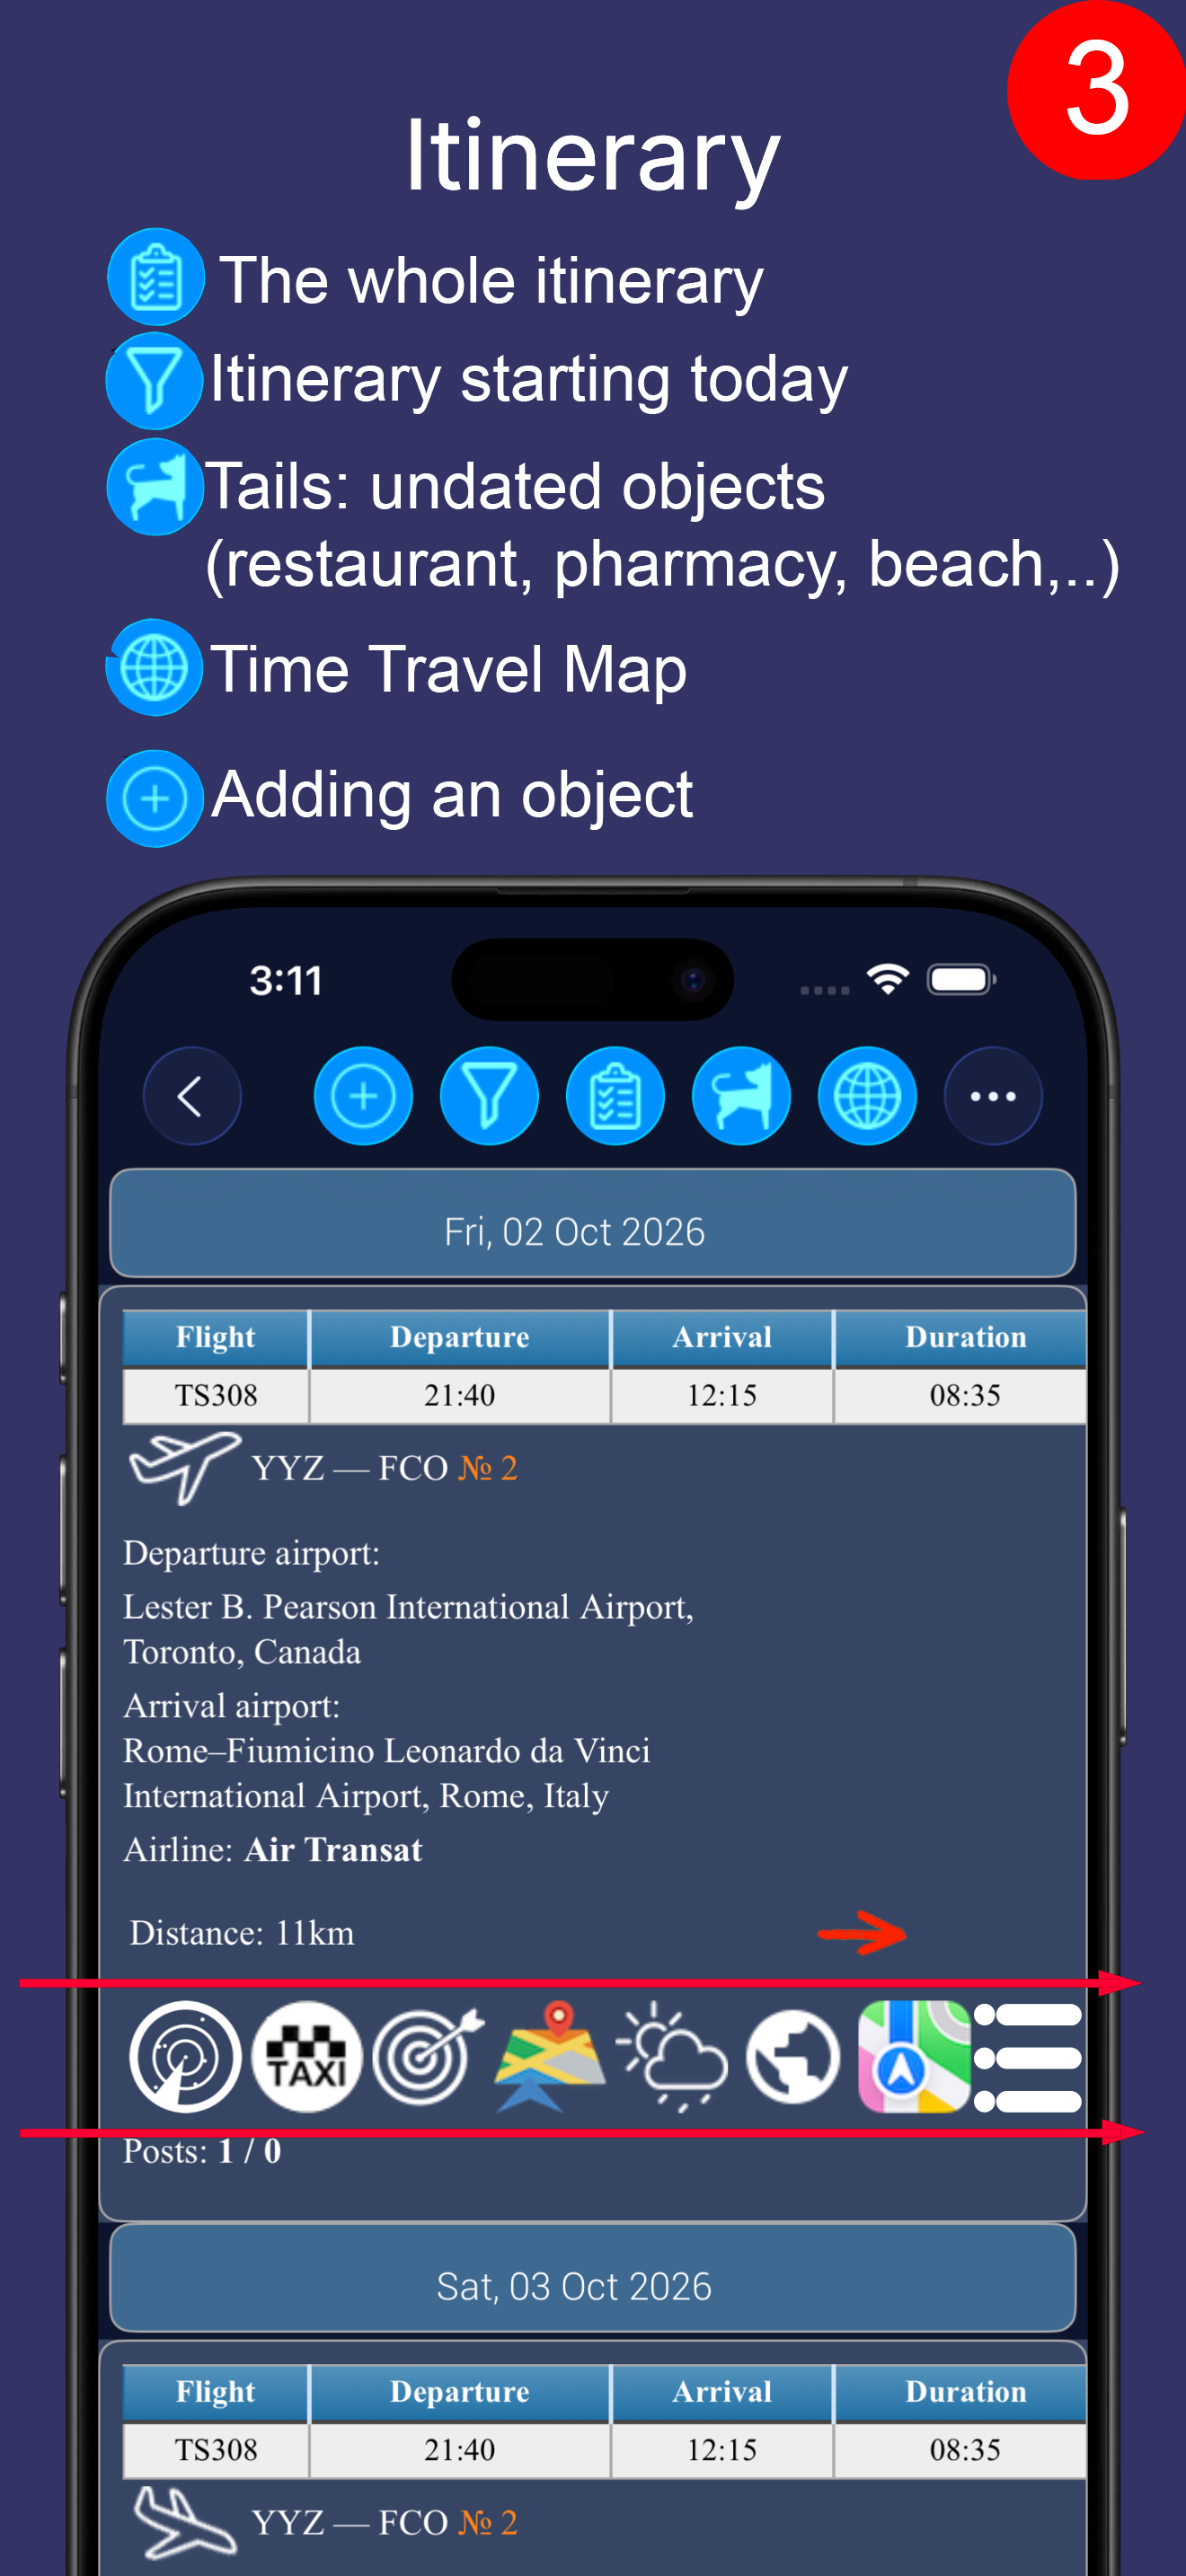
The plan can be viewed in several ways:
 |
Full plan. When planning, it's more convenient to see the entire travel plan. |
 |
Travel plan starting from today. This option is more convenient to use during the trip. |
 |
Tails are objects without a visit date (for example, a beach, pharmacy, gas station, etc.). In other viewing modes, they are at the very bottom in the "Objects without dates" section. |
 |
Hide layovers for flights (in the menu). You can hide the display of layovers for flights to avoid cluttering the list of objects. |
 |
Show layovers for flights (in the menu). |
 |
You can add travel objects to the plan (flights, hotels, car rentals, attractions, buses, trains, transfers, restaurants, etc.) |
 |
Travel map. This helps you visualize the geography of your trip, the relative positions of travel objects, and distances. |
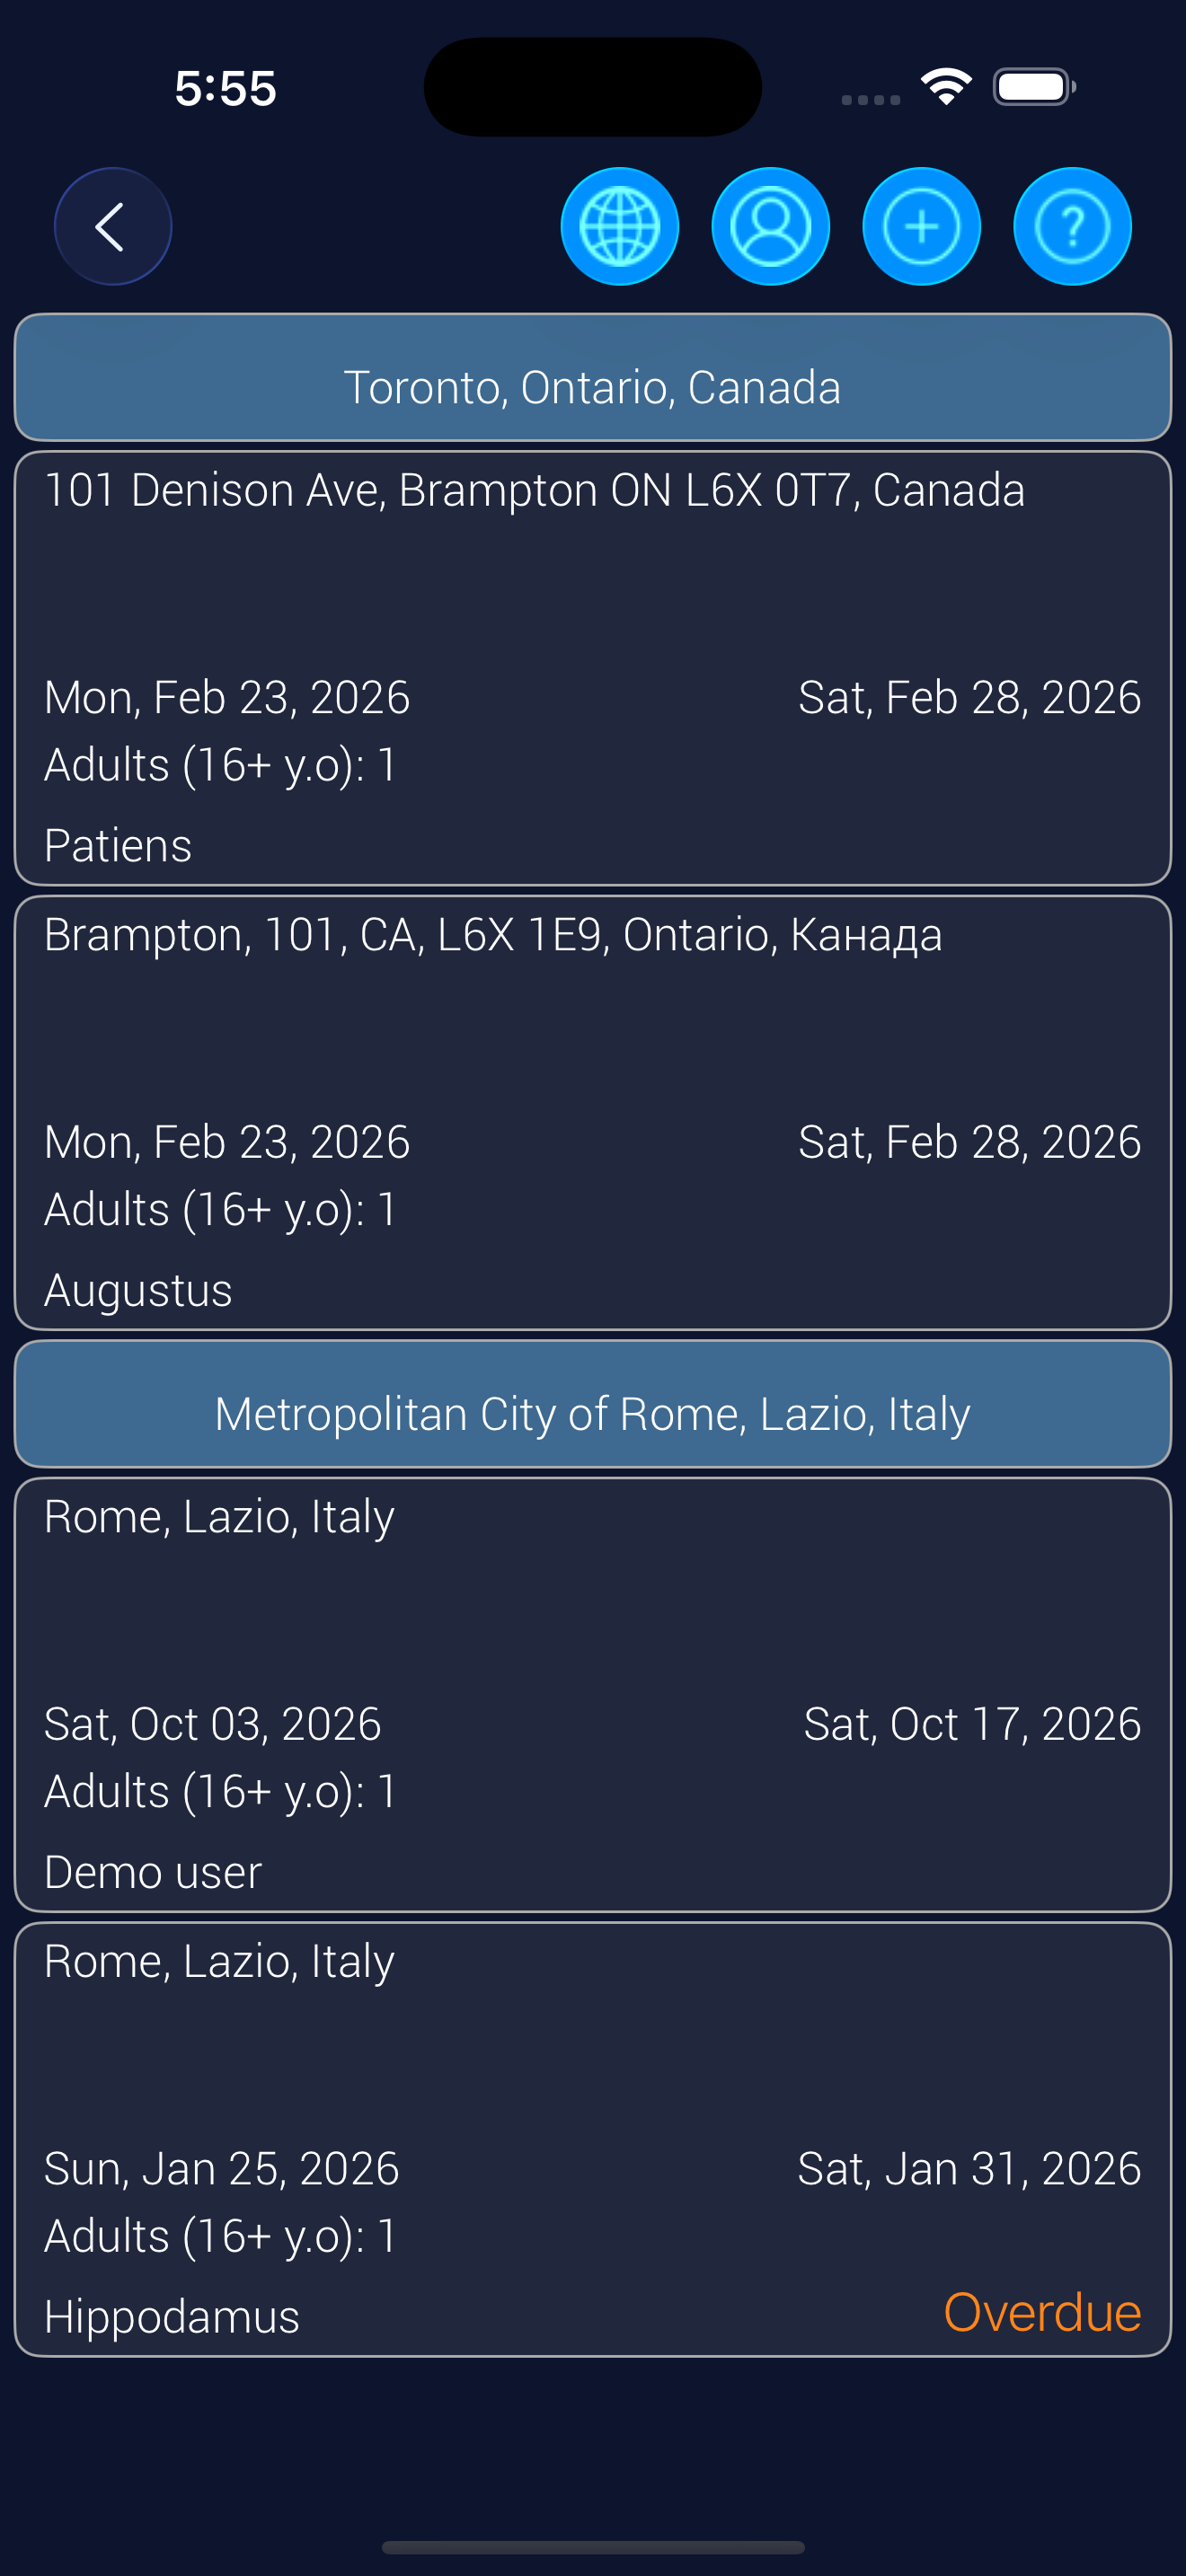
In this example, you can see part of the travel plan: departure from Toronto on Friday, October 2nd, arrival in Rome on October 3rd (partially).
On each cell, you can see a brief description of the object, the distance to the object, and the direction: for example, the airport is currently 11 km to the East from you.
If you tap on a cell, you will get information about the object and a large number of options for exploring the object (from the screen menu). The menu is described below in the "Detailed description" section.
Pay attention to the icons on the travel object cell, they are bounded by red lines. Below we will explain what they are.
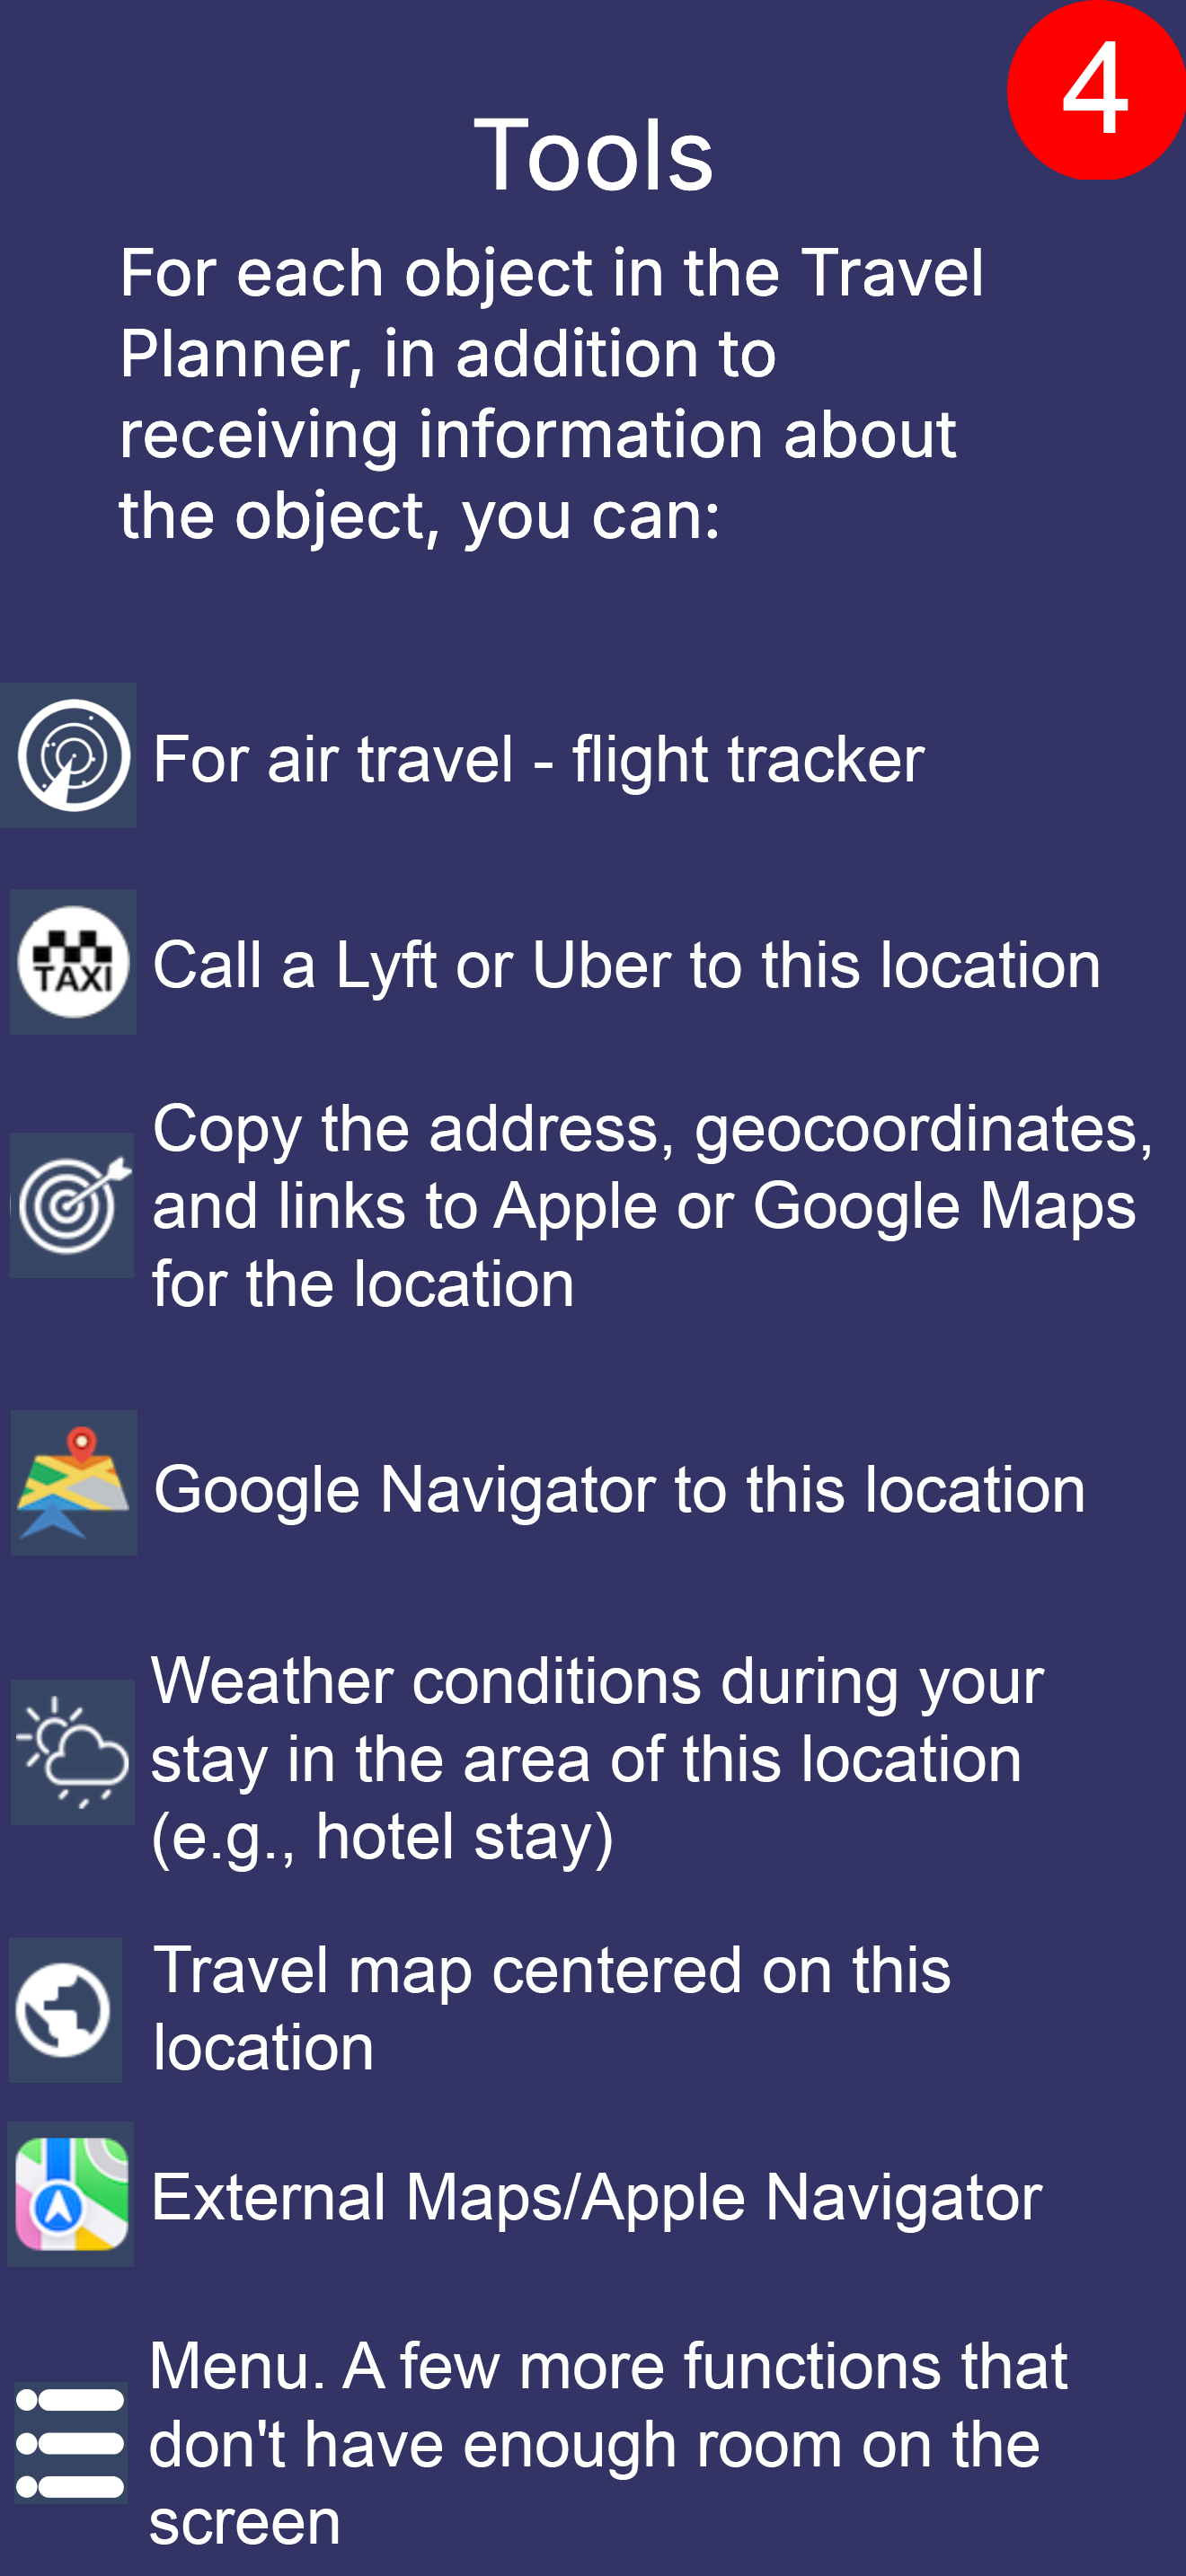
Features for each object
 |
Flight tracker for flights. Flight status before, during, and after the flight. |
 |
Call a Lyft or Uber taxi from you to this object (if you have the Lyft or Uber app installed). |
 |
Coordinates and address of the object for use, for example, in other taxi apps. |
 |
Google navigator with this place as the destination. |
 |
Weather forecast for the period of your stay at this location. For example, for the departure day or for the duration of your hotel stay. |
| Travel map with this object at the center. | |
 |
External map (Apple or Google depending on the platform). |
 |
Menu. This is what didn't fit in the cell - Google Street View; Google search; current weather in this place and a 14-day forecast; nearby cities; search for various points of interest near this one (restaurants, gas stations, ATMs, beaches, parks, attractions, etc.); directions - not from you, but from this point; current weather; photos taken in the vicinity of this place. |
This means that for each object in the plan, you have 14 functions available, all within one or two clicks (from the menu). And, of course, if you click on the cell itself, you'll get a description of the object and more.
This is just the travel plan viewing screen, which is only a small part of the app's capabilities.
If you're interested, below you can get more detailed information about the app.
For business trips
Let's say you need to visit three places during the day. How do you plan your time? Use "Routes". For example, you're staying at a hotel, find it in the plan. From the menu on the hotel cell, select "Routes". There, find place #1 that you need to visit. Open the navigator (or taxi) from the place #1 cell. It will show you the route from the hotel to place #1.
Now in "Routes", on the cell with place #1, select "Routes" again.
In the opened window, find place #2 and open the navigator or taxi. You've probably already figured out that now you'll see the route from place #1 to place #2.
This way you can estimate the time you'll need to travel between meetings.
For example, you have time to have lunch between visiting places #1 and #2. It's probably more convenient to have lunch near either place #1 or place #2.
In the plan, on the cell for place #1, select "Search around object" from the menu. In the window that appears, select "Restaurants". Now in the restaurants window, open the filter (on the toolbar), check, for example, "Italian", "Mexican", "Peruvian".
In addition to the description in the app, there will be a link to the information provider. There will also be a Google search for this restaurant.
Found objects (we're talking about restaurants now) can be added to the travel plan. If you're right now at place #1 - call a taxi (or open the navigator) to this object.
Also, for people who travel frequently, it may be worth paying attention to the PRO mode of the app. It's also free, features additional functionality, and a slightly different workflow.
PRO mode is described below on the website.
Platforms
You can install the app for iOS or Android or visit the website.
The website only helps with planning, because trip assistance depends on your physical location, and people usually don't walk around with a computer in their hands.
If you want to learn more about how the app works, scroll down.

Web
Planning

Android
Planning and trip assistance


iOS
Planning and trip assistance

App operation modes
The app can work in two modes - Light and Pro (also free). Pro mode adds more features but is also more complex to use.
The app starts in Light mode by default. You can switch to Pro mode later ("Settings" - "App operation mode"). The differences are described there as well.
But don't do it right away. Try Light mode first. If you like it, check out what Pro mode offers.
Detailed description, Light mode
Let us explain in more detail what benefits you get when using the enot66 app.
Object description screen menu
For each travel object (flight, hotel, attraction, etc.) you can open a description screen. It has a menu that will help you explore the object and its surroundings.
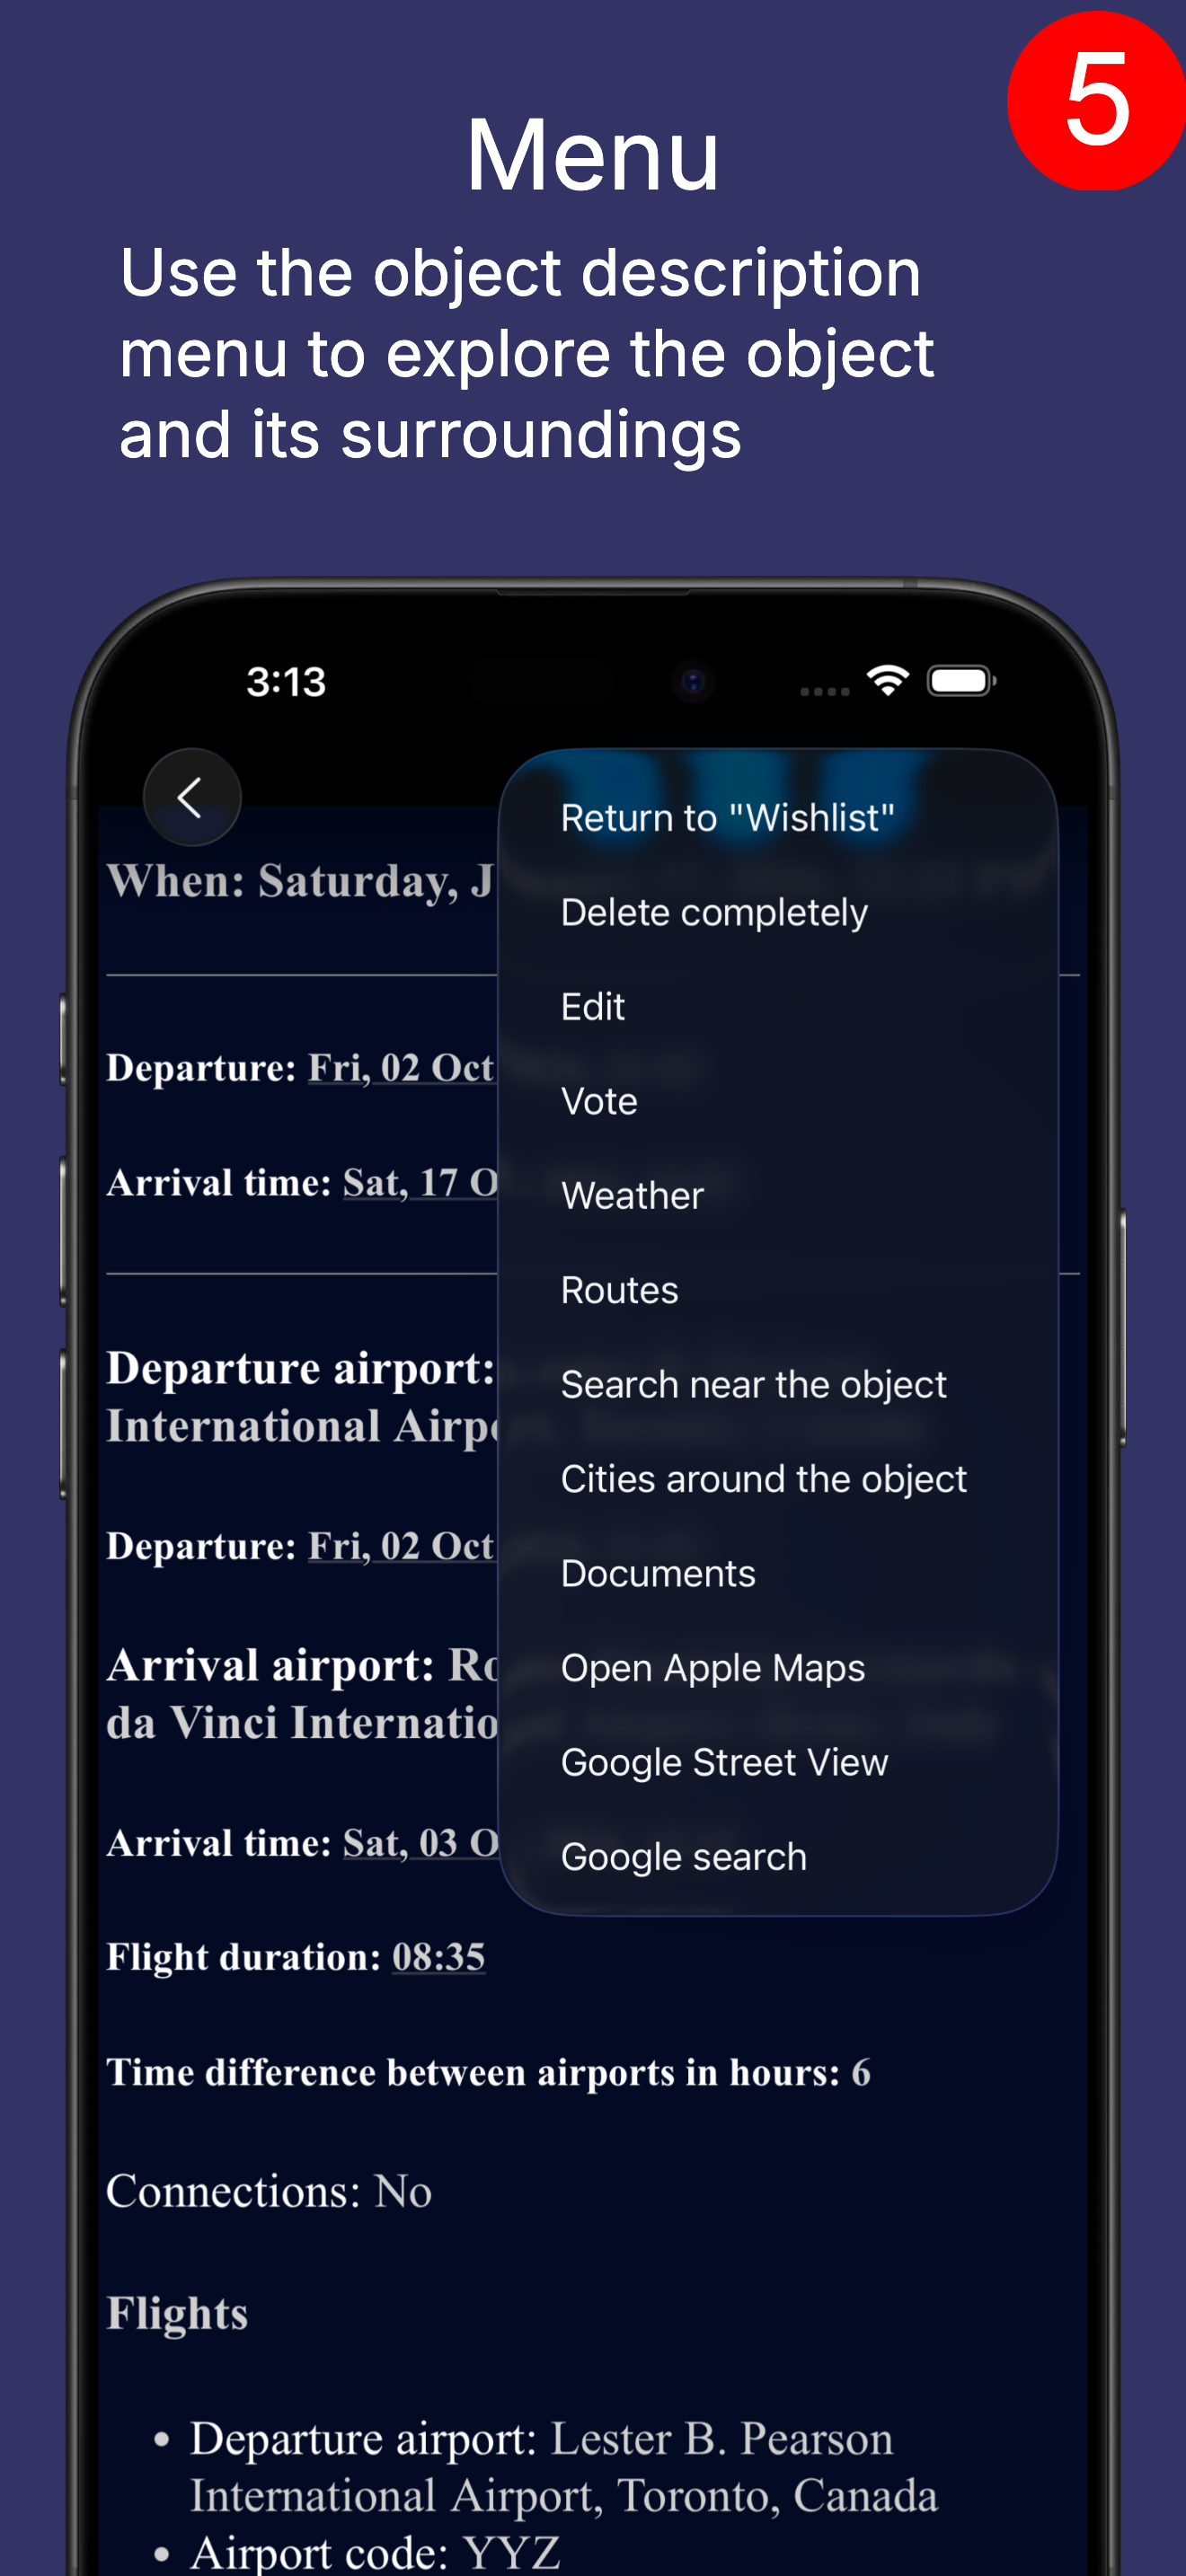
- Description. Description of the object (if available).
- Photos. Photos of the object (if available).
- In Pro mode, for some objects - a link to offers on an external website where you can book this object (for example, a flight, hotel, car, etc.).
- Map. Opens the app's internal maps where you will see your travel objects. This helps to understand the big picture. The maps have settings (in the menu) - which objects you want to see there. For example, while traveling, you can disable the display of objects in the "Wishlist" (Pro mode).
- Move to "Plan" (Light mode). You can move a found restaurant, for example, to the "Plan".
- Weather. You can check the weather forecast for the dates you'll be at this location. The forecast is shown for 2 weeks ahead. If it's, say, a month away, a statistical forecast based on previous years' data will be shown.
- Routes. You will get a list of travel objects (you can set a filter). These are the same objects as in the "Maps" menu. You will see straight-line distances to this object and the direction. Also, for each object you can: check the fare and route for an Uber taxi; see the route on Google Navigator; check the weather forecast; open external maps with this object (Google or Apple depending on the platform), etc. "Routes" and "Maps" will help you better understand the geography of your trip.
- Search around. You can search around an object for many different types of objects. For example, a beach near a hotel. At the same time, the found beach is the same travel object as a hotel or a flight. This means it will have exactly the same menu, and you can also add it to the "Plan", or search for a restaurant near the found beach, which can also become a travel object.
- Cities around. You will see settlements around the object and can view information about each settlement and its attractions.
- Excursions. These are interesting places and tours in the area of this object.
- Apple or Google Maps. Open Apple or Google Maps depending on the platform. These are powerful tools that can also help in understanding the area near the object.
- Google Street View. Open Google Street View at this location. If Google doesn't have this information for the given place, it may show photos.
- Photos 2. These are photos taken within a 500-meter radius around this location (if available). This also helps in understanding the place you're going to.
- Google Search. Opens Google with a preset query. There you can also find something useful about this object. For example, for a flight you'll get the airport website where you'll find the most up-to-date information about the airport. Or restaurant reviews for a restaurant. Or a description for an attraction. Etc.
- Copy coordinates to clipboard. You can send the object's coordinates to someone else.
- Main menu. On the enot66.com website, you can switch from viewing a hotel description to, for example, searching for flights by simply clicking the "Flights" tab, and then return to the hotel description by clicking the "Accommodations" tab. In the mobile app, it's not possible to preserve screen states. But you can select this menu item, go to the app's main screen, check the flights, and then return to the hotel description.
Where am I?
Search for different types of objects around you
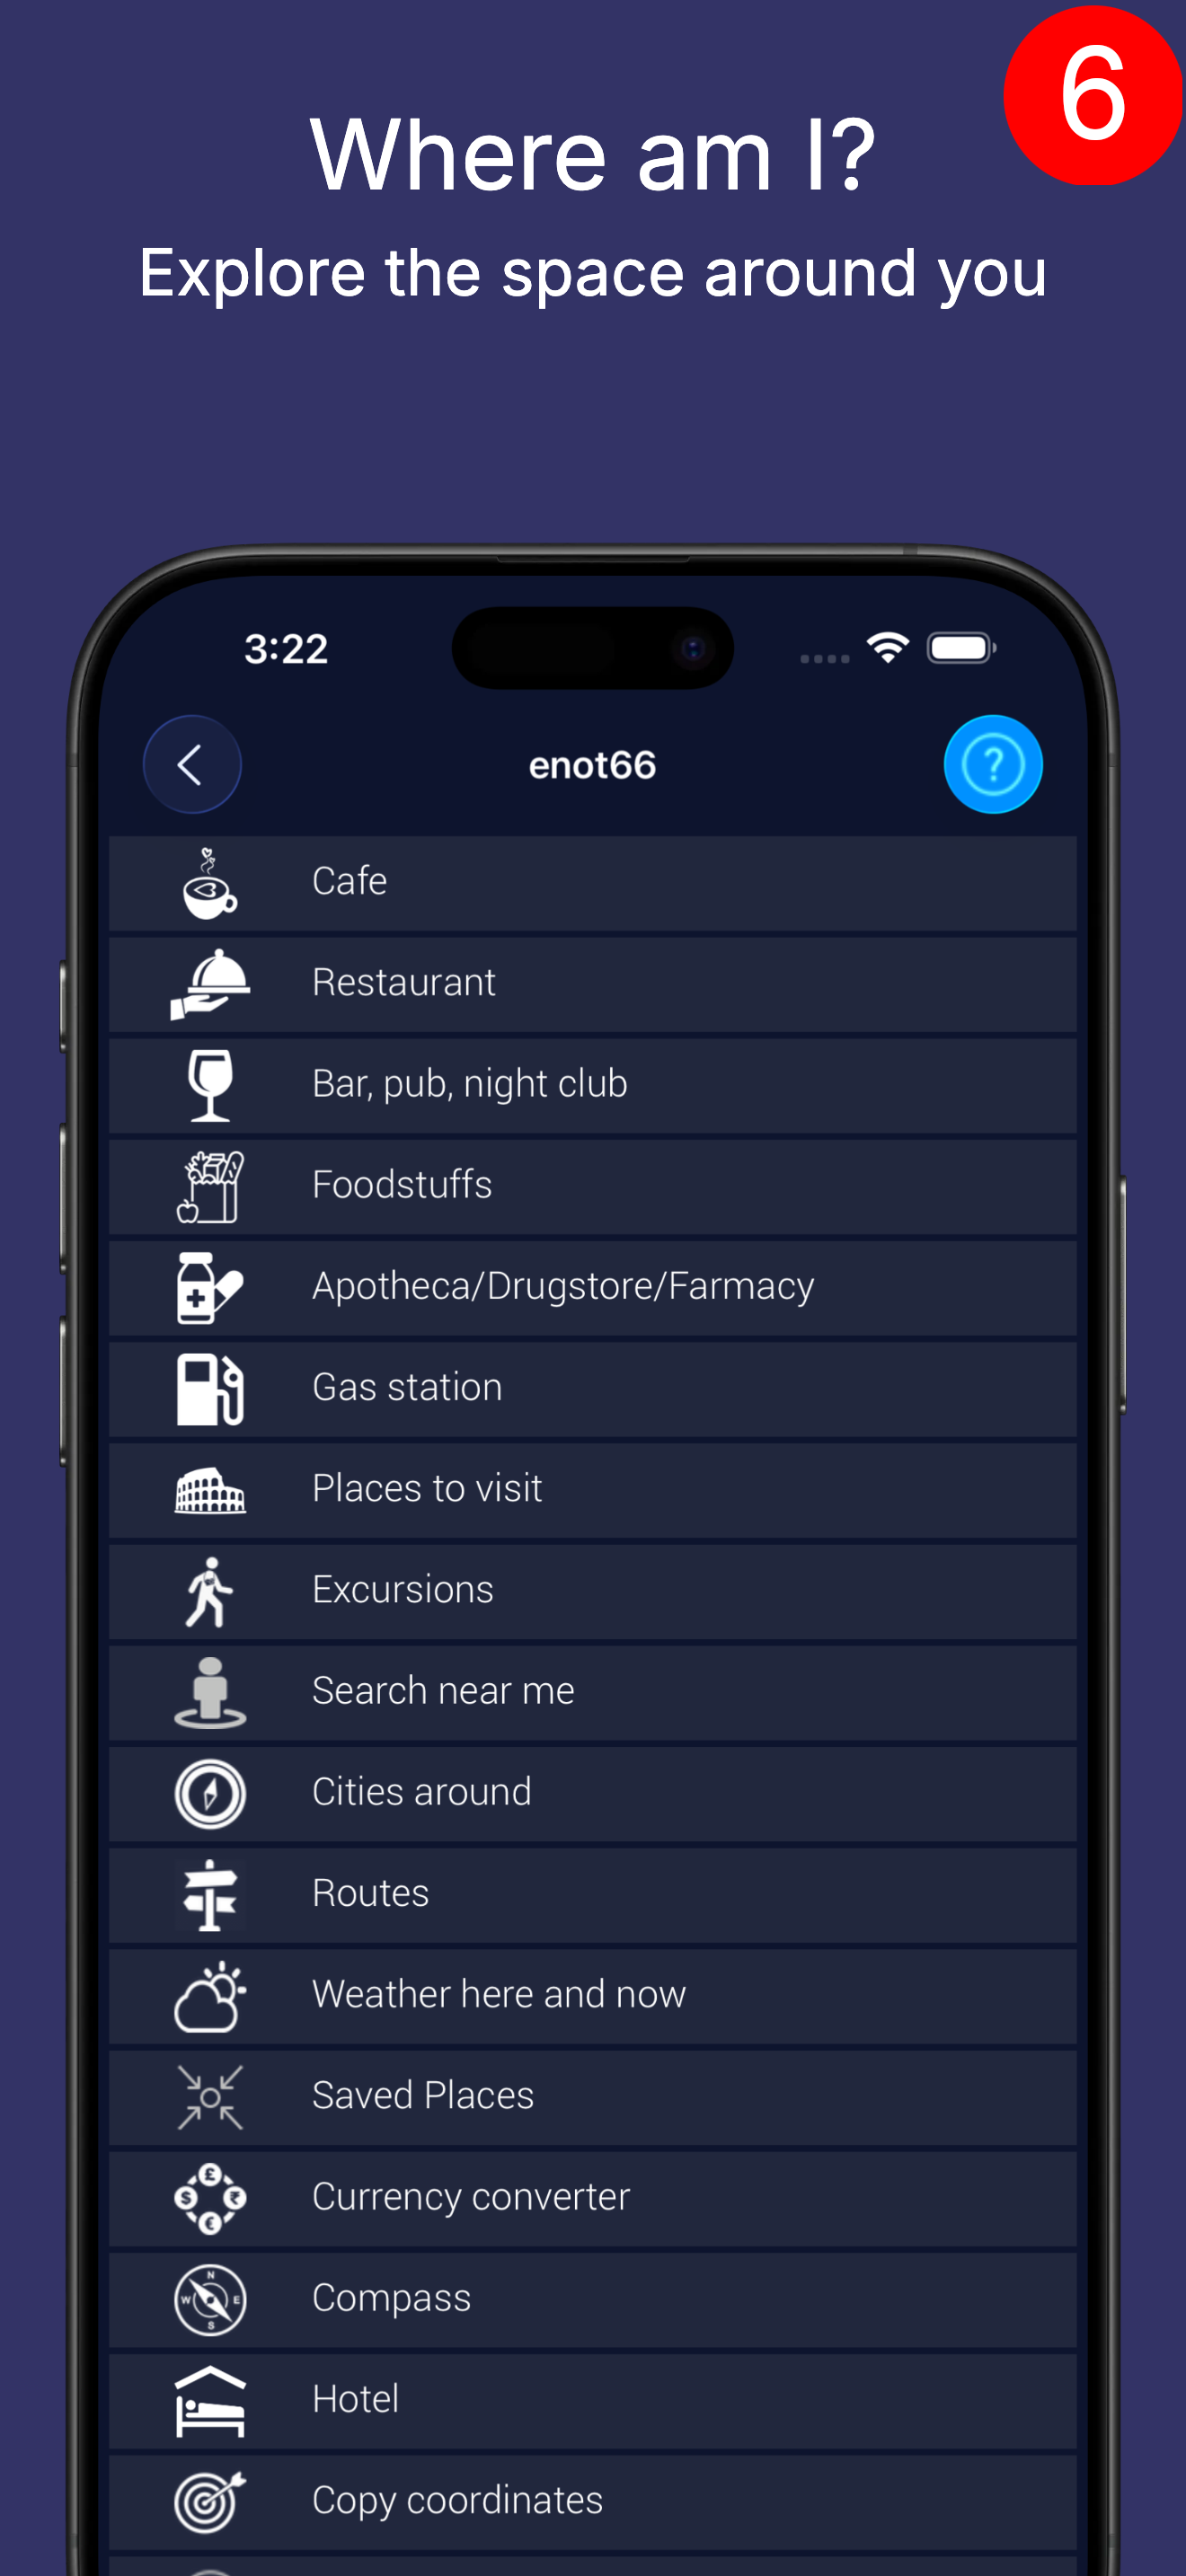
Any found object can be added to the "Plan" in Light mode or saved to the "Wishlist" or "Selected" in Pro mode and become a travel object.
For example, you can find a restaurant near you and add it to the "Plan" (or not add it, and just head there right away).
In the restaurant description menu, you will see the "Search around" item. In it, you can find parking near the restaurant. And then an ATM near the parking.
Any found object can be added to the "Plan" (Light mode) or "Wishlist", "Selected" (Pro mode).
Weather
You can check the weather forecast here and now plus a 14-day forecast.
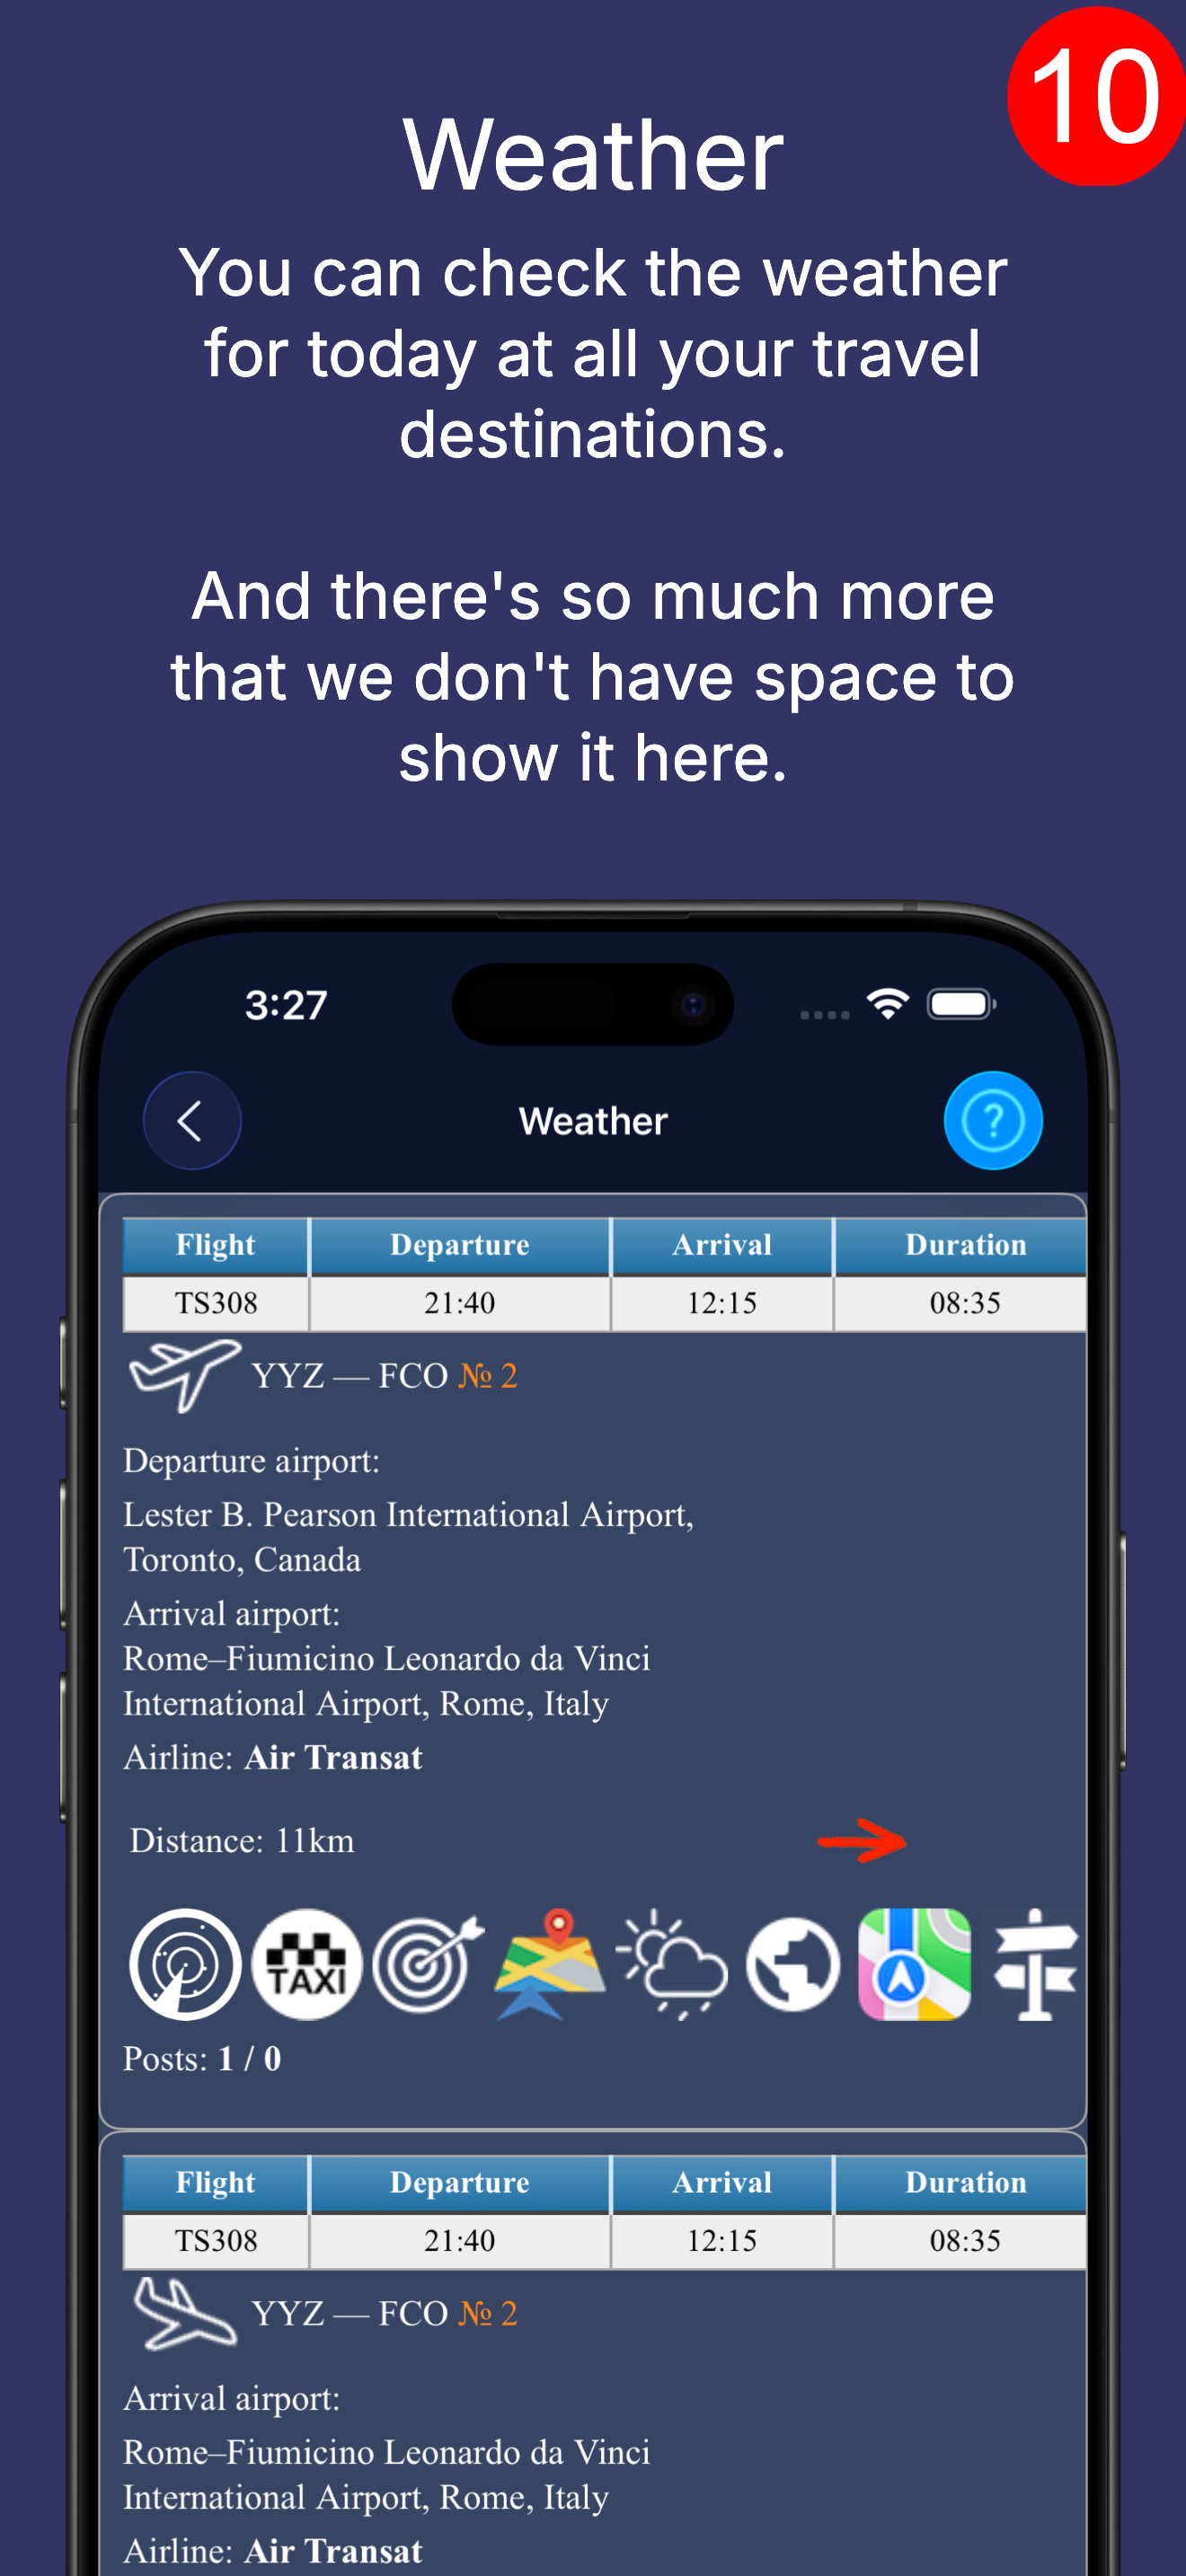
You can also view the weather forecast for all travel objects.
This differs from the weather forecast on the "Plan" screen. There, the forecast is shown for the dates when you will be at that object.
In this menu, the forecast is shown for today and two weeks ahead. For example, you can check the attractions and go to the one where the weather is better right now.
Saved places
You can save places that you might need during your trip.
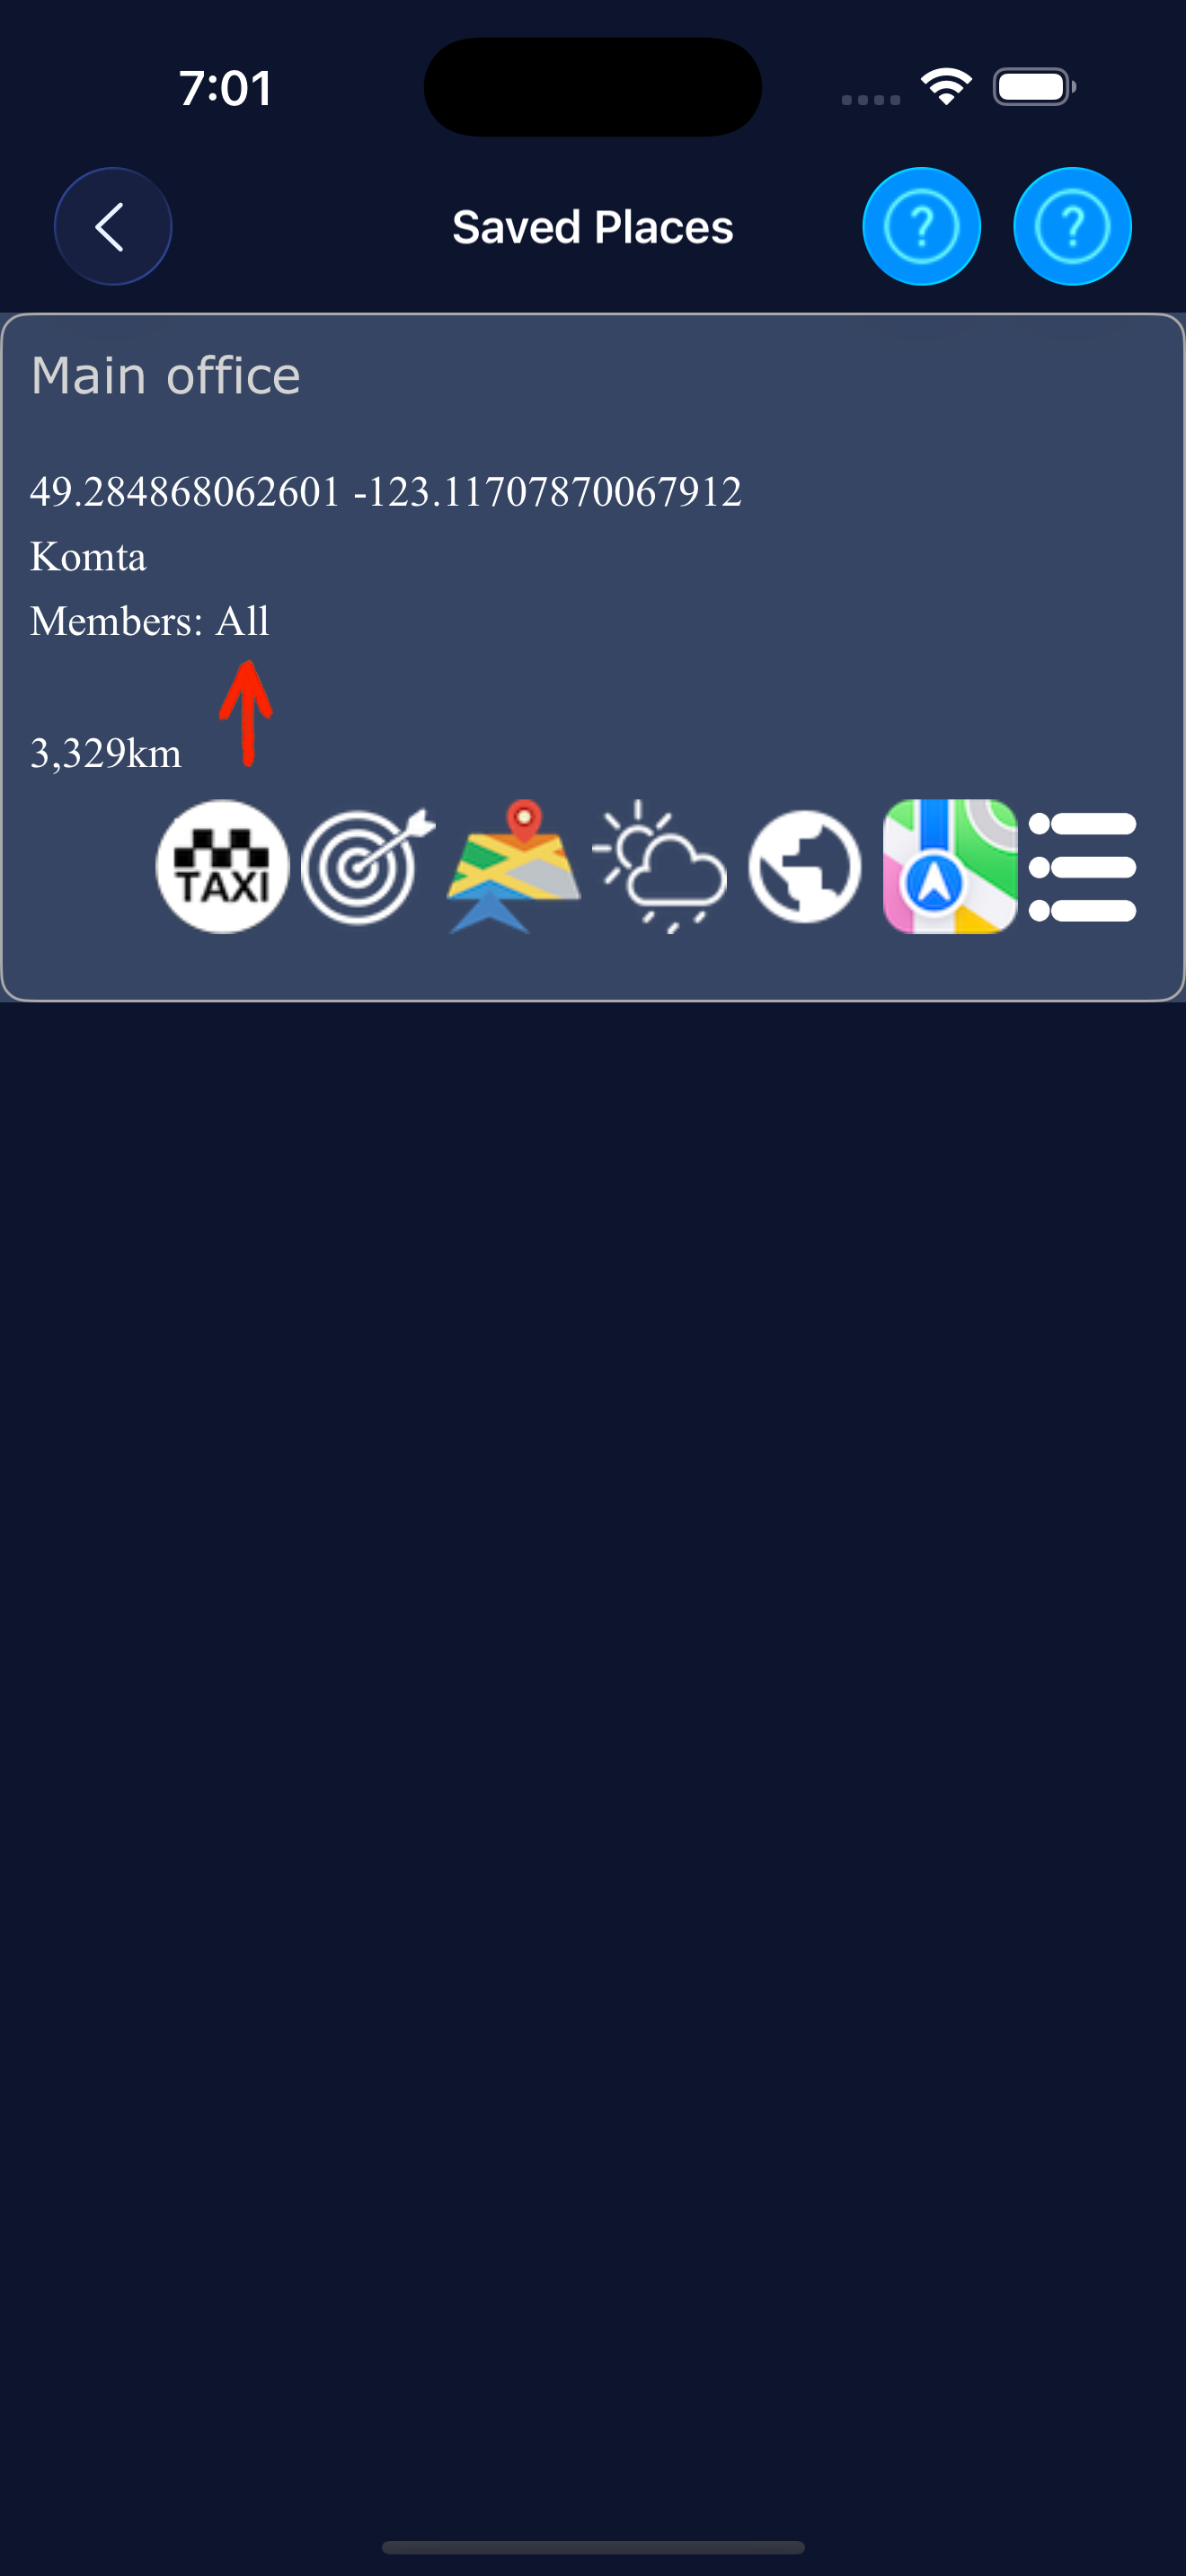
These are places that you need but don't want to include in the travel plan. For example, because you need them temporarily.
For example, you need to meet at the bus station you just arrived at in a few hours. One person adds the place, and all trip participants get the same meeting point.
Or you need to meet somewhere after some time. One person adds the place (by map or address), and everyone gets the same location.
Or you got lost in an unfamiliar city and want to let the others know where you are.
As you can see in the example, the screen has the same features as in the plan - taxi, coordinates, navigator, etc.
You can choose which trip participants will see this place.
You can tell the app to send a message to the trip participants along with saving the place (for example, if you got lost).
Compass
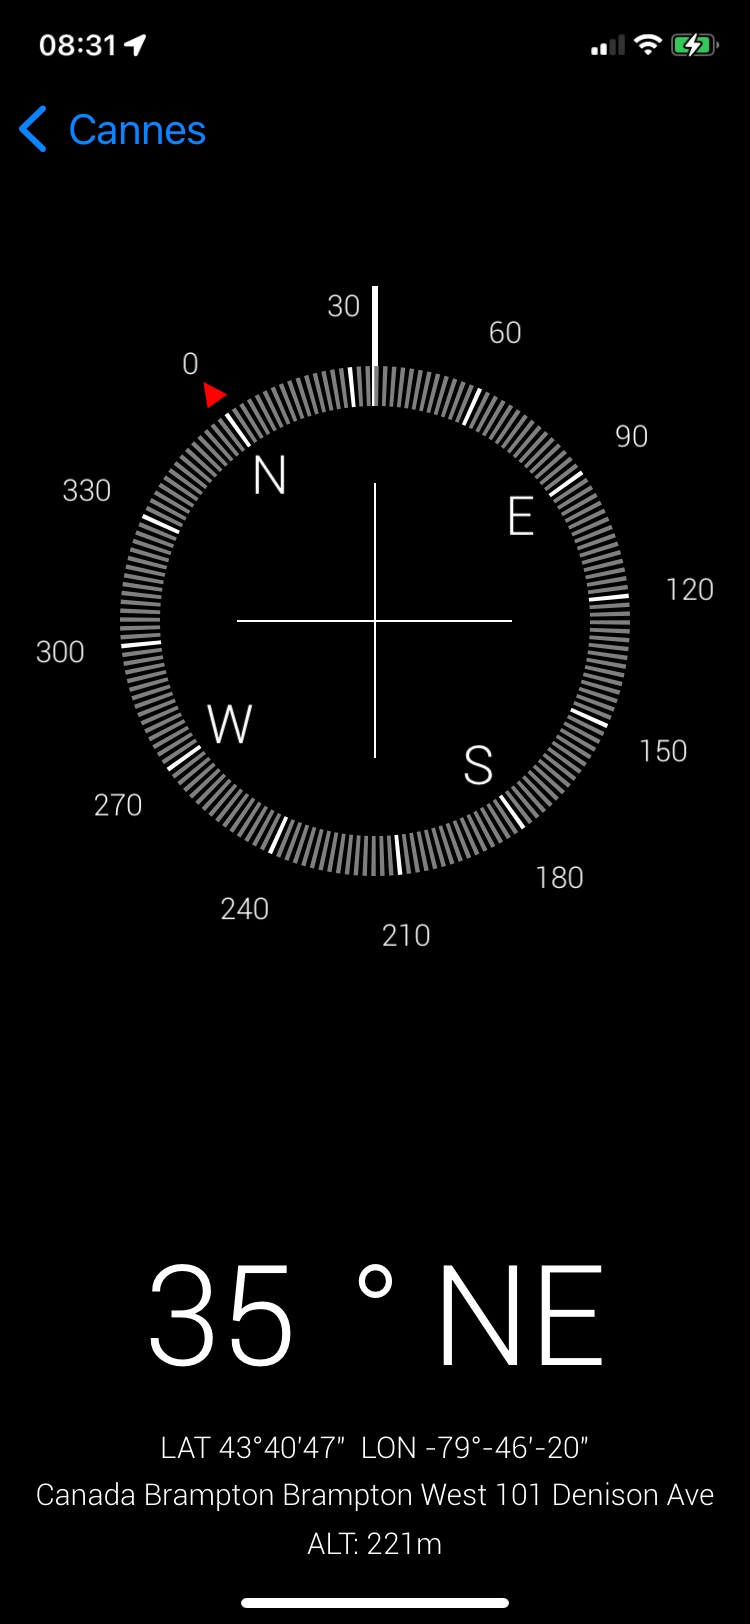
Sometimes a compass can be useful.
Works on any iOS device, but not every Android device (depends on the model - whether the model has certain sensors).
Currency converter
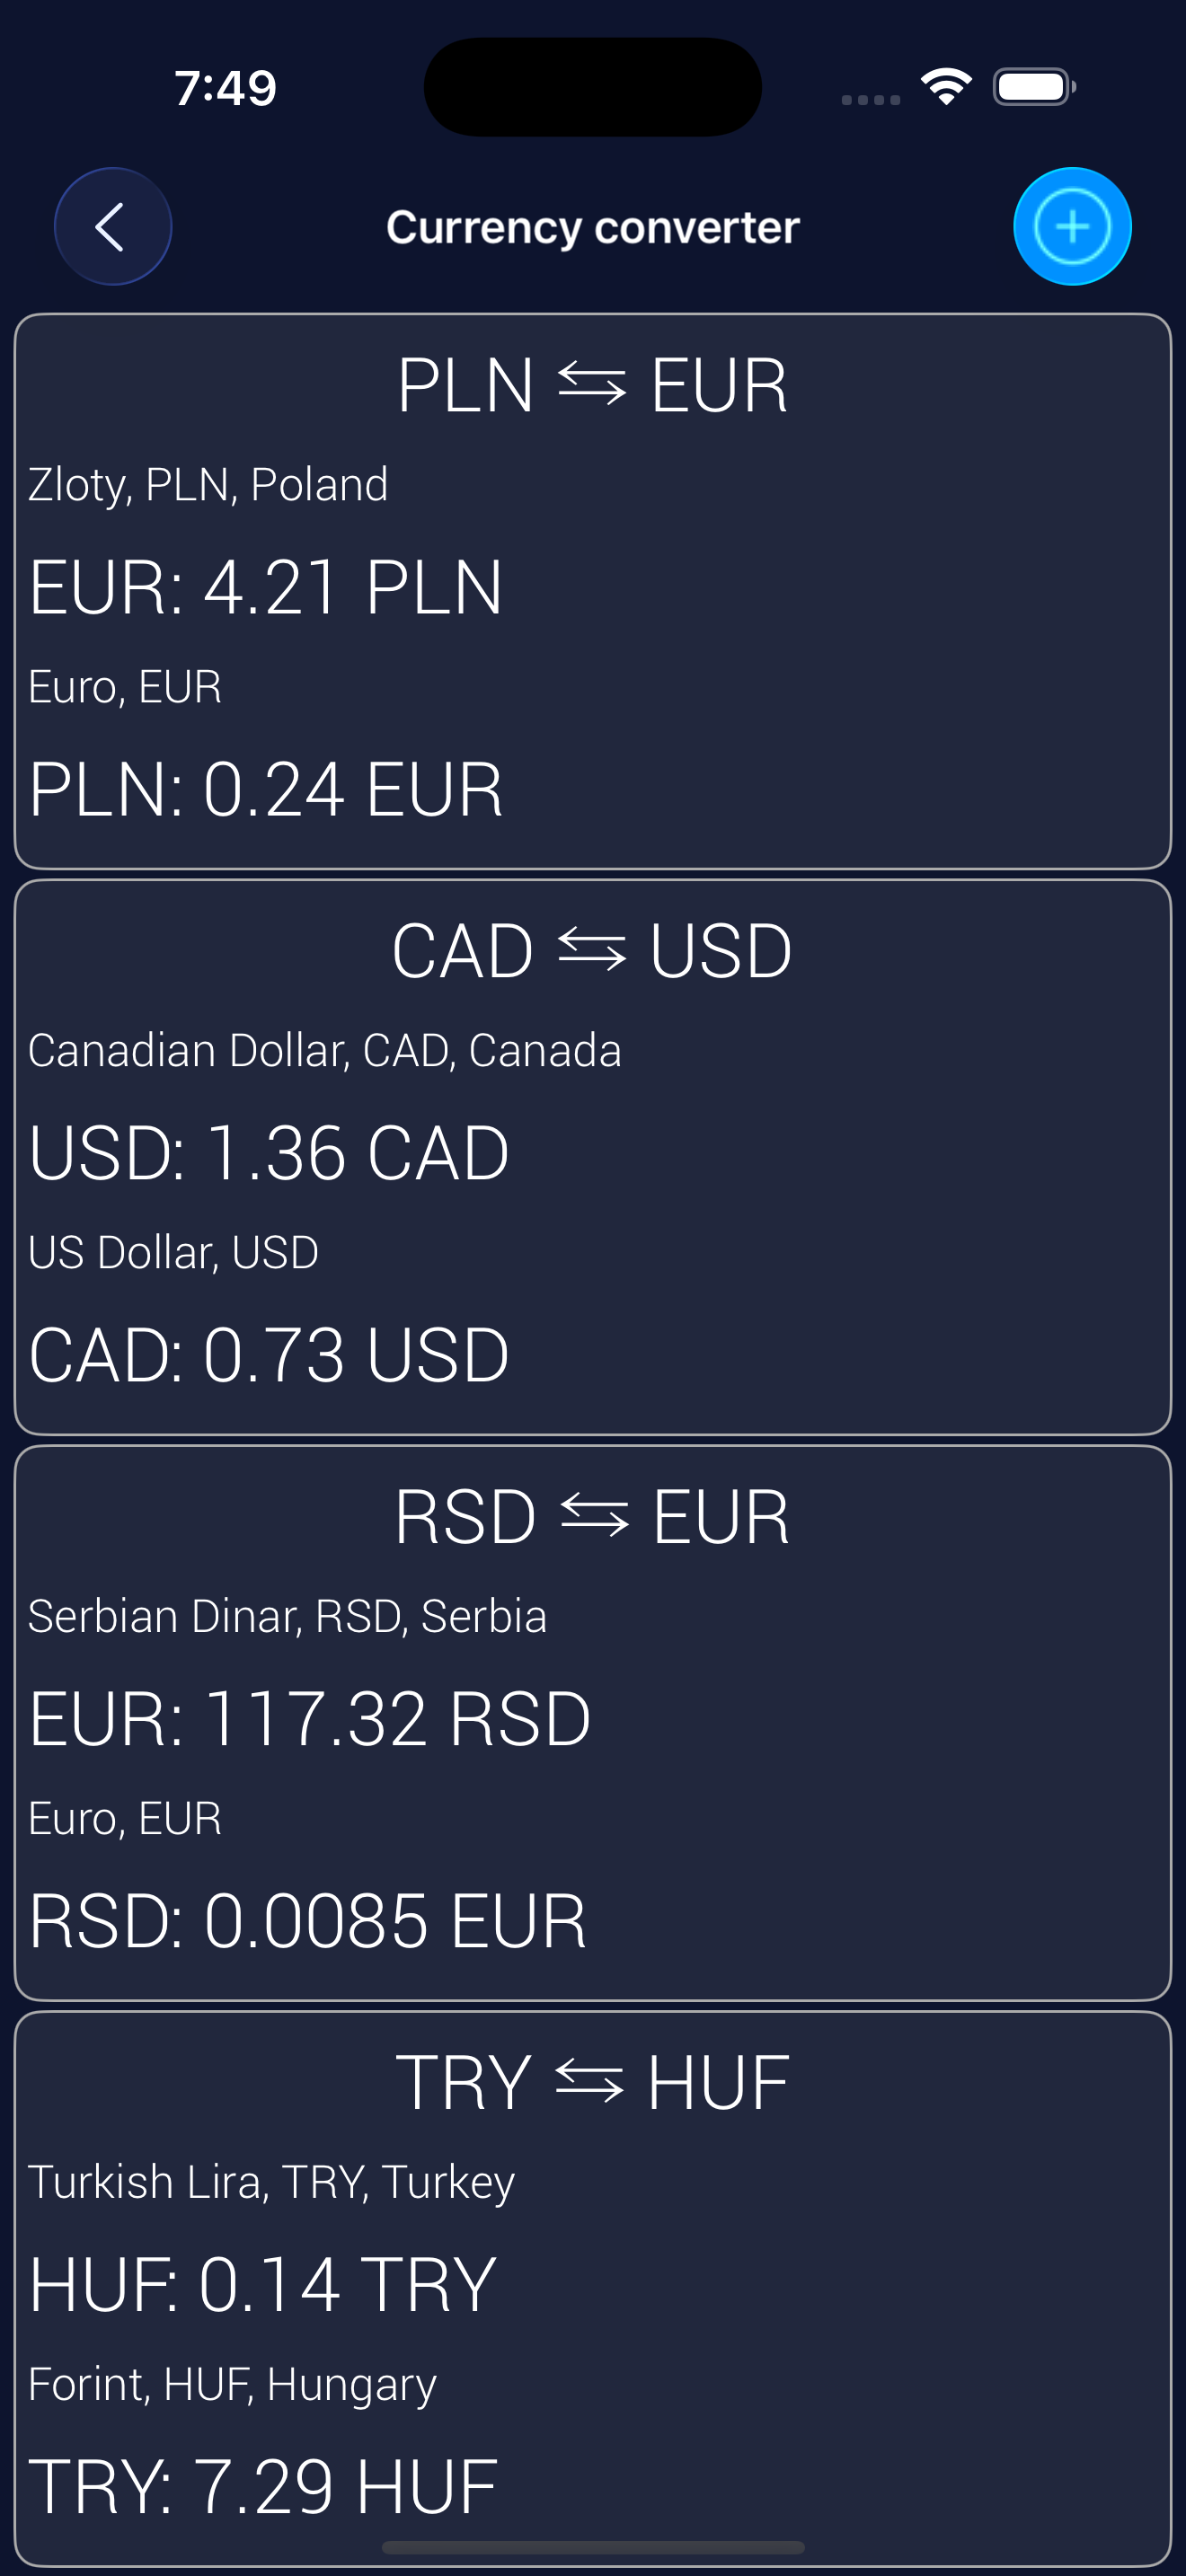
You can create any number of currency pair converters and convert currency in both directions.
Money
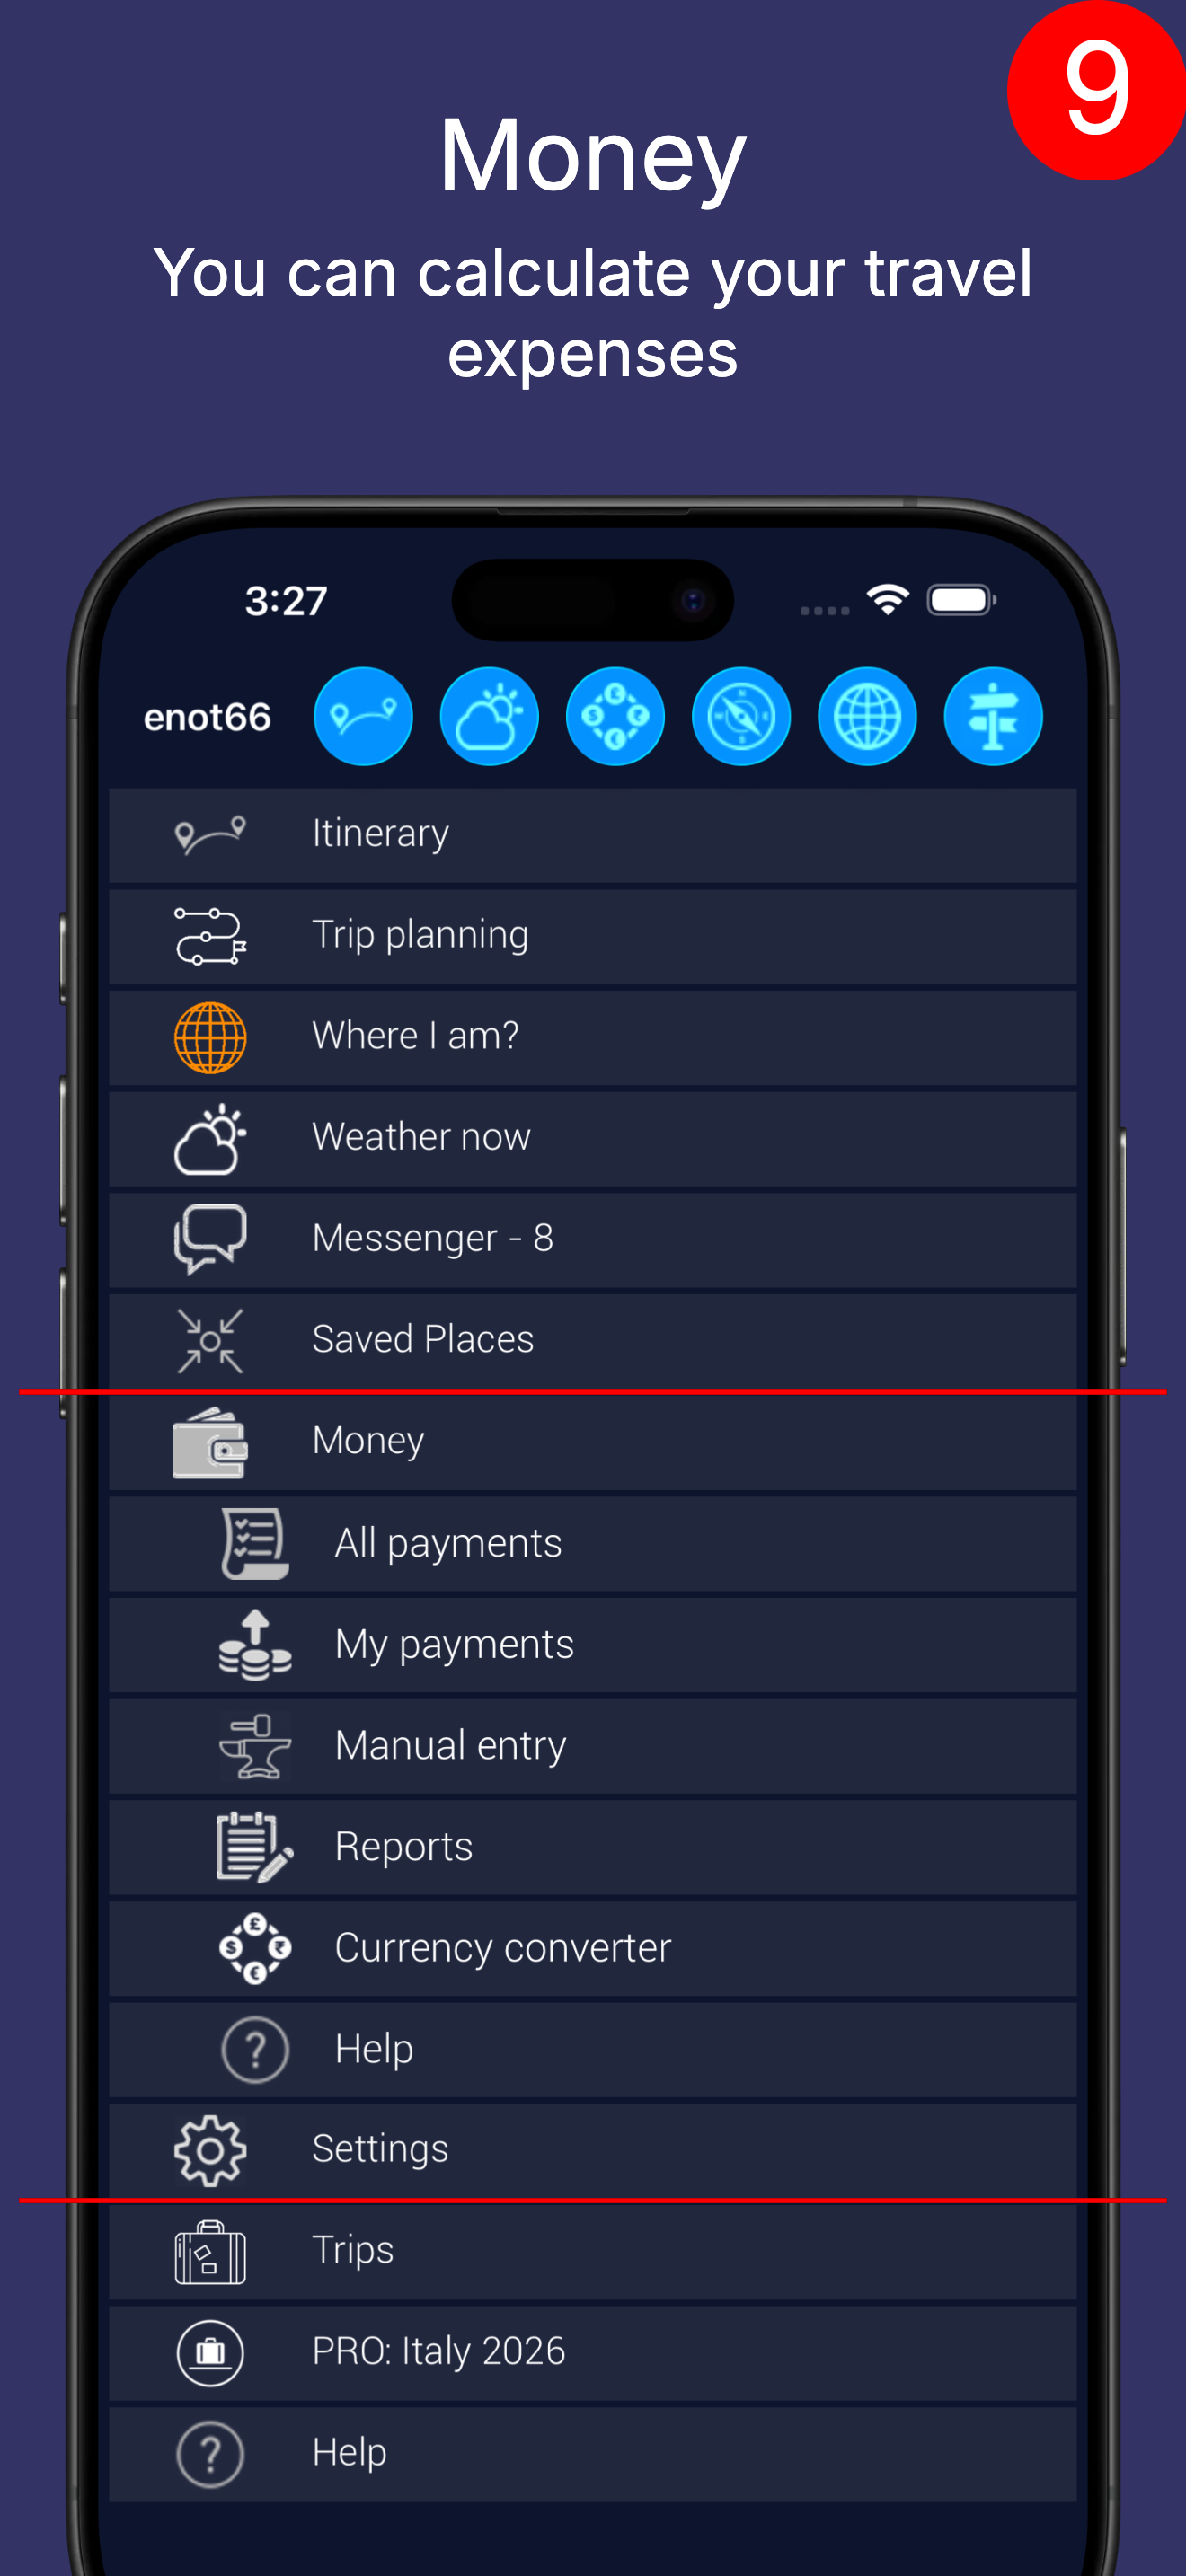
You can keep track of money spent during the trip.
All objects moved to the "Plan" that have a price are recorded in the expenses list. You can set who exactly paid for a particular travel object (menu in the object description, "Edit" item, who paid).
You can also add payments manually.
At the end of the trip, you can review the travel expenses report.
Trips
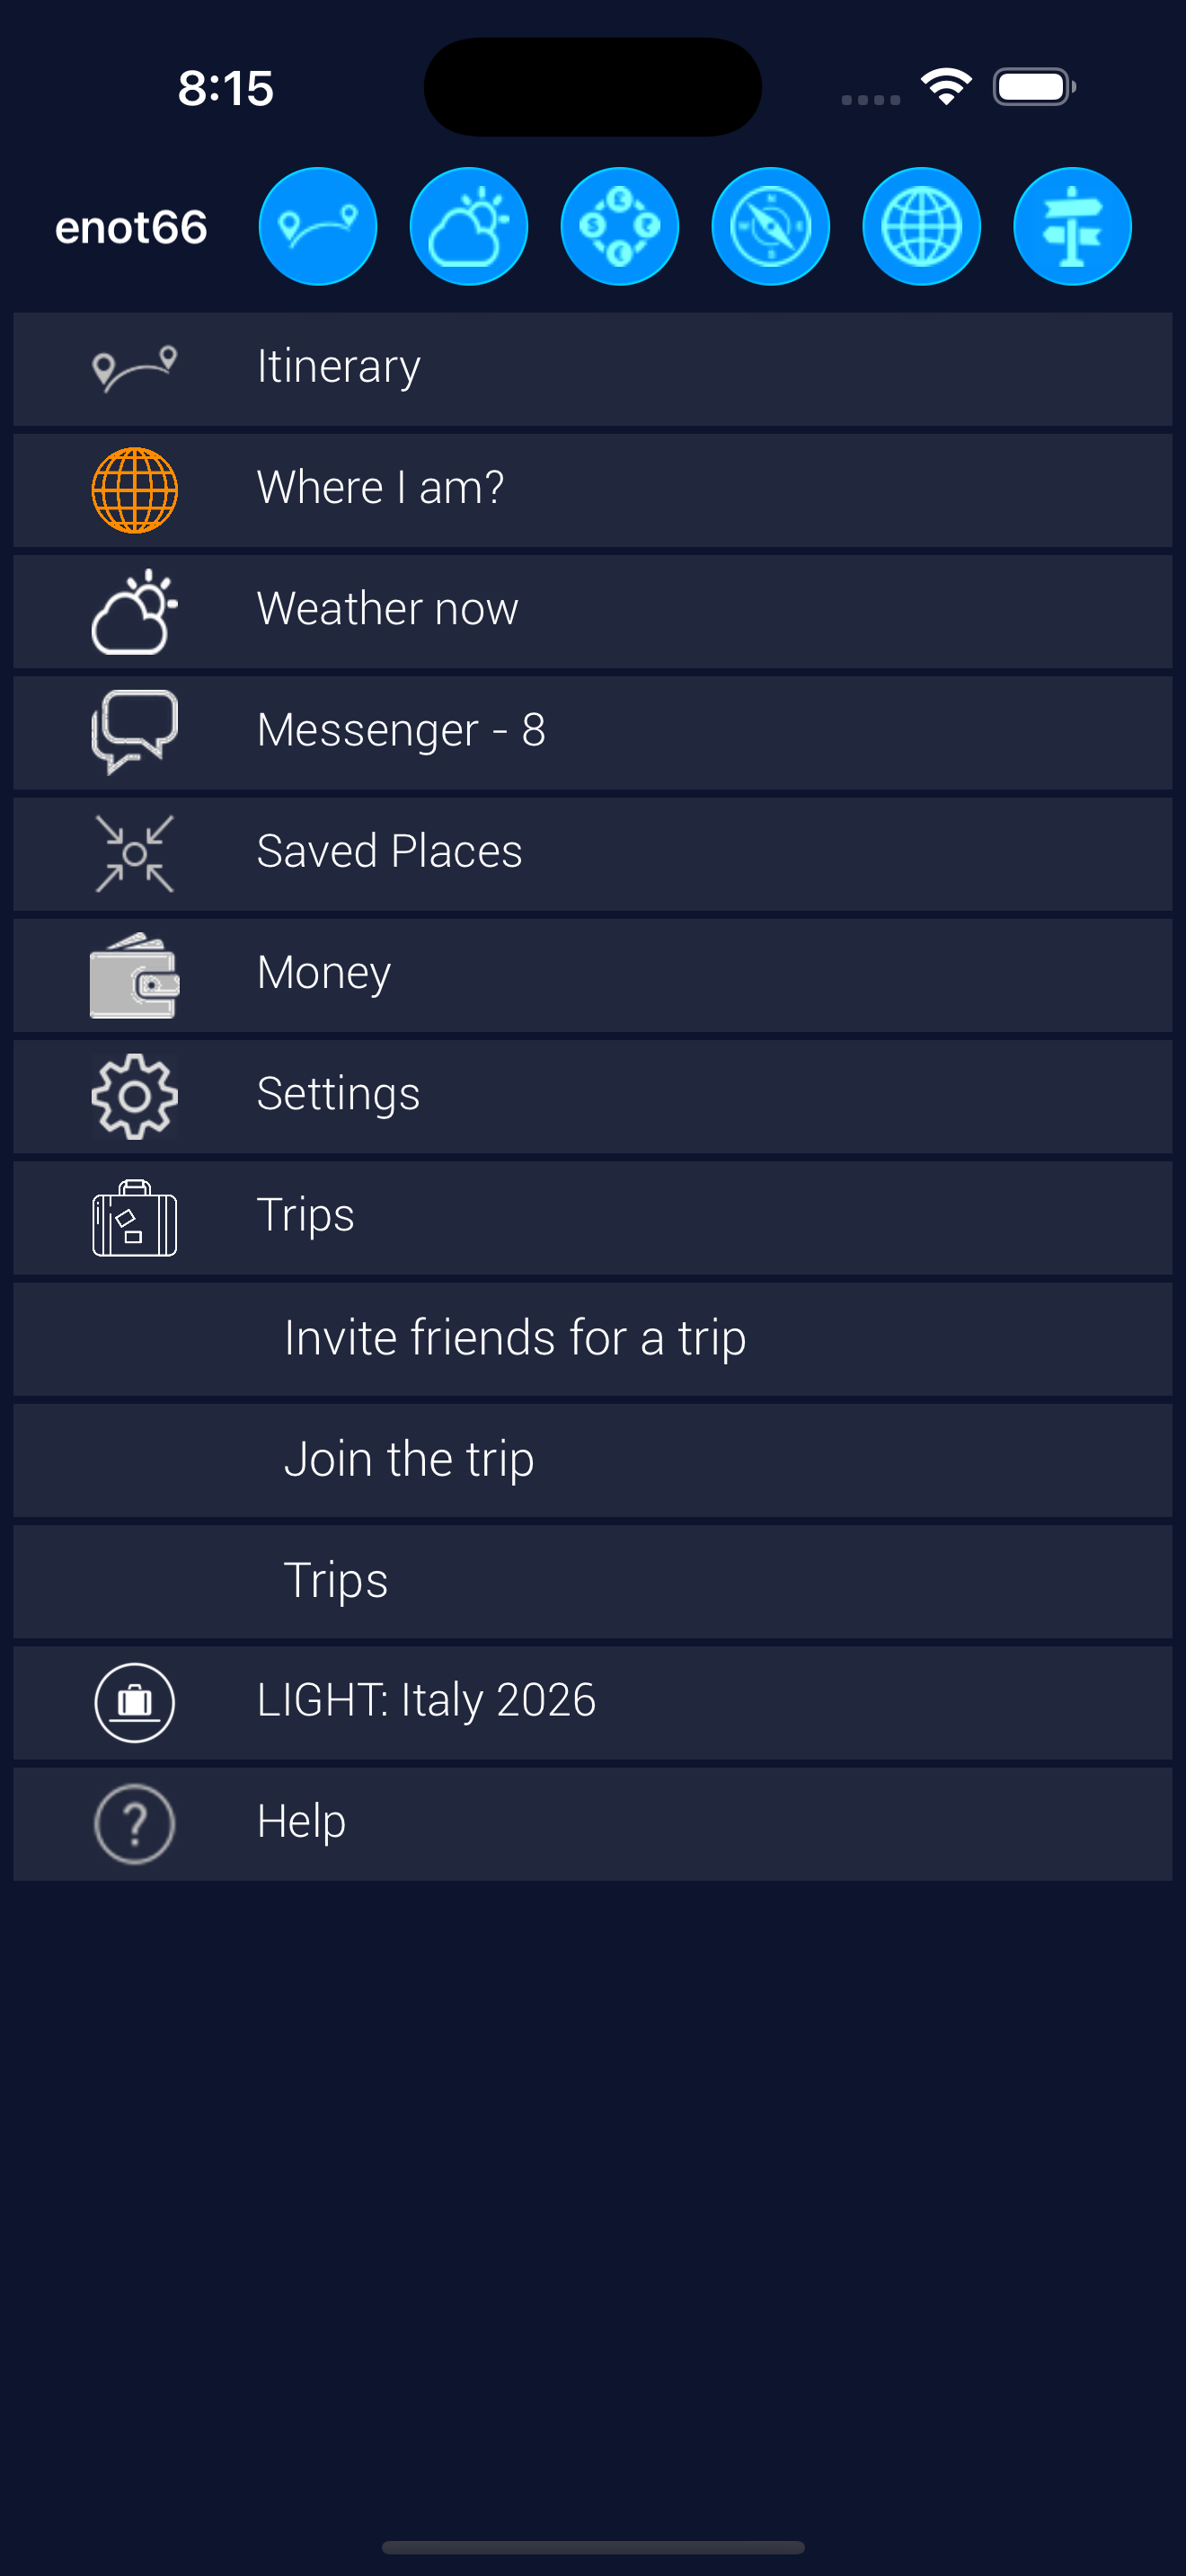
You can create new trips.
You can switch between trips.
You can invite other people to a trip.
You can accept invitations from other people and join their trips.
Settings
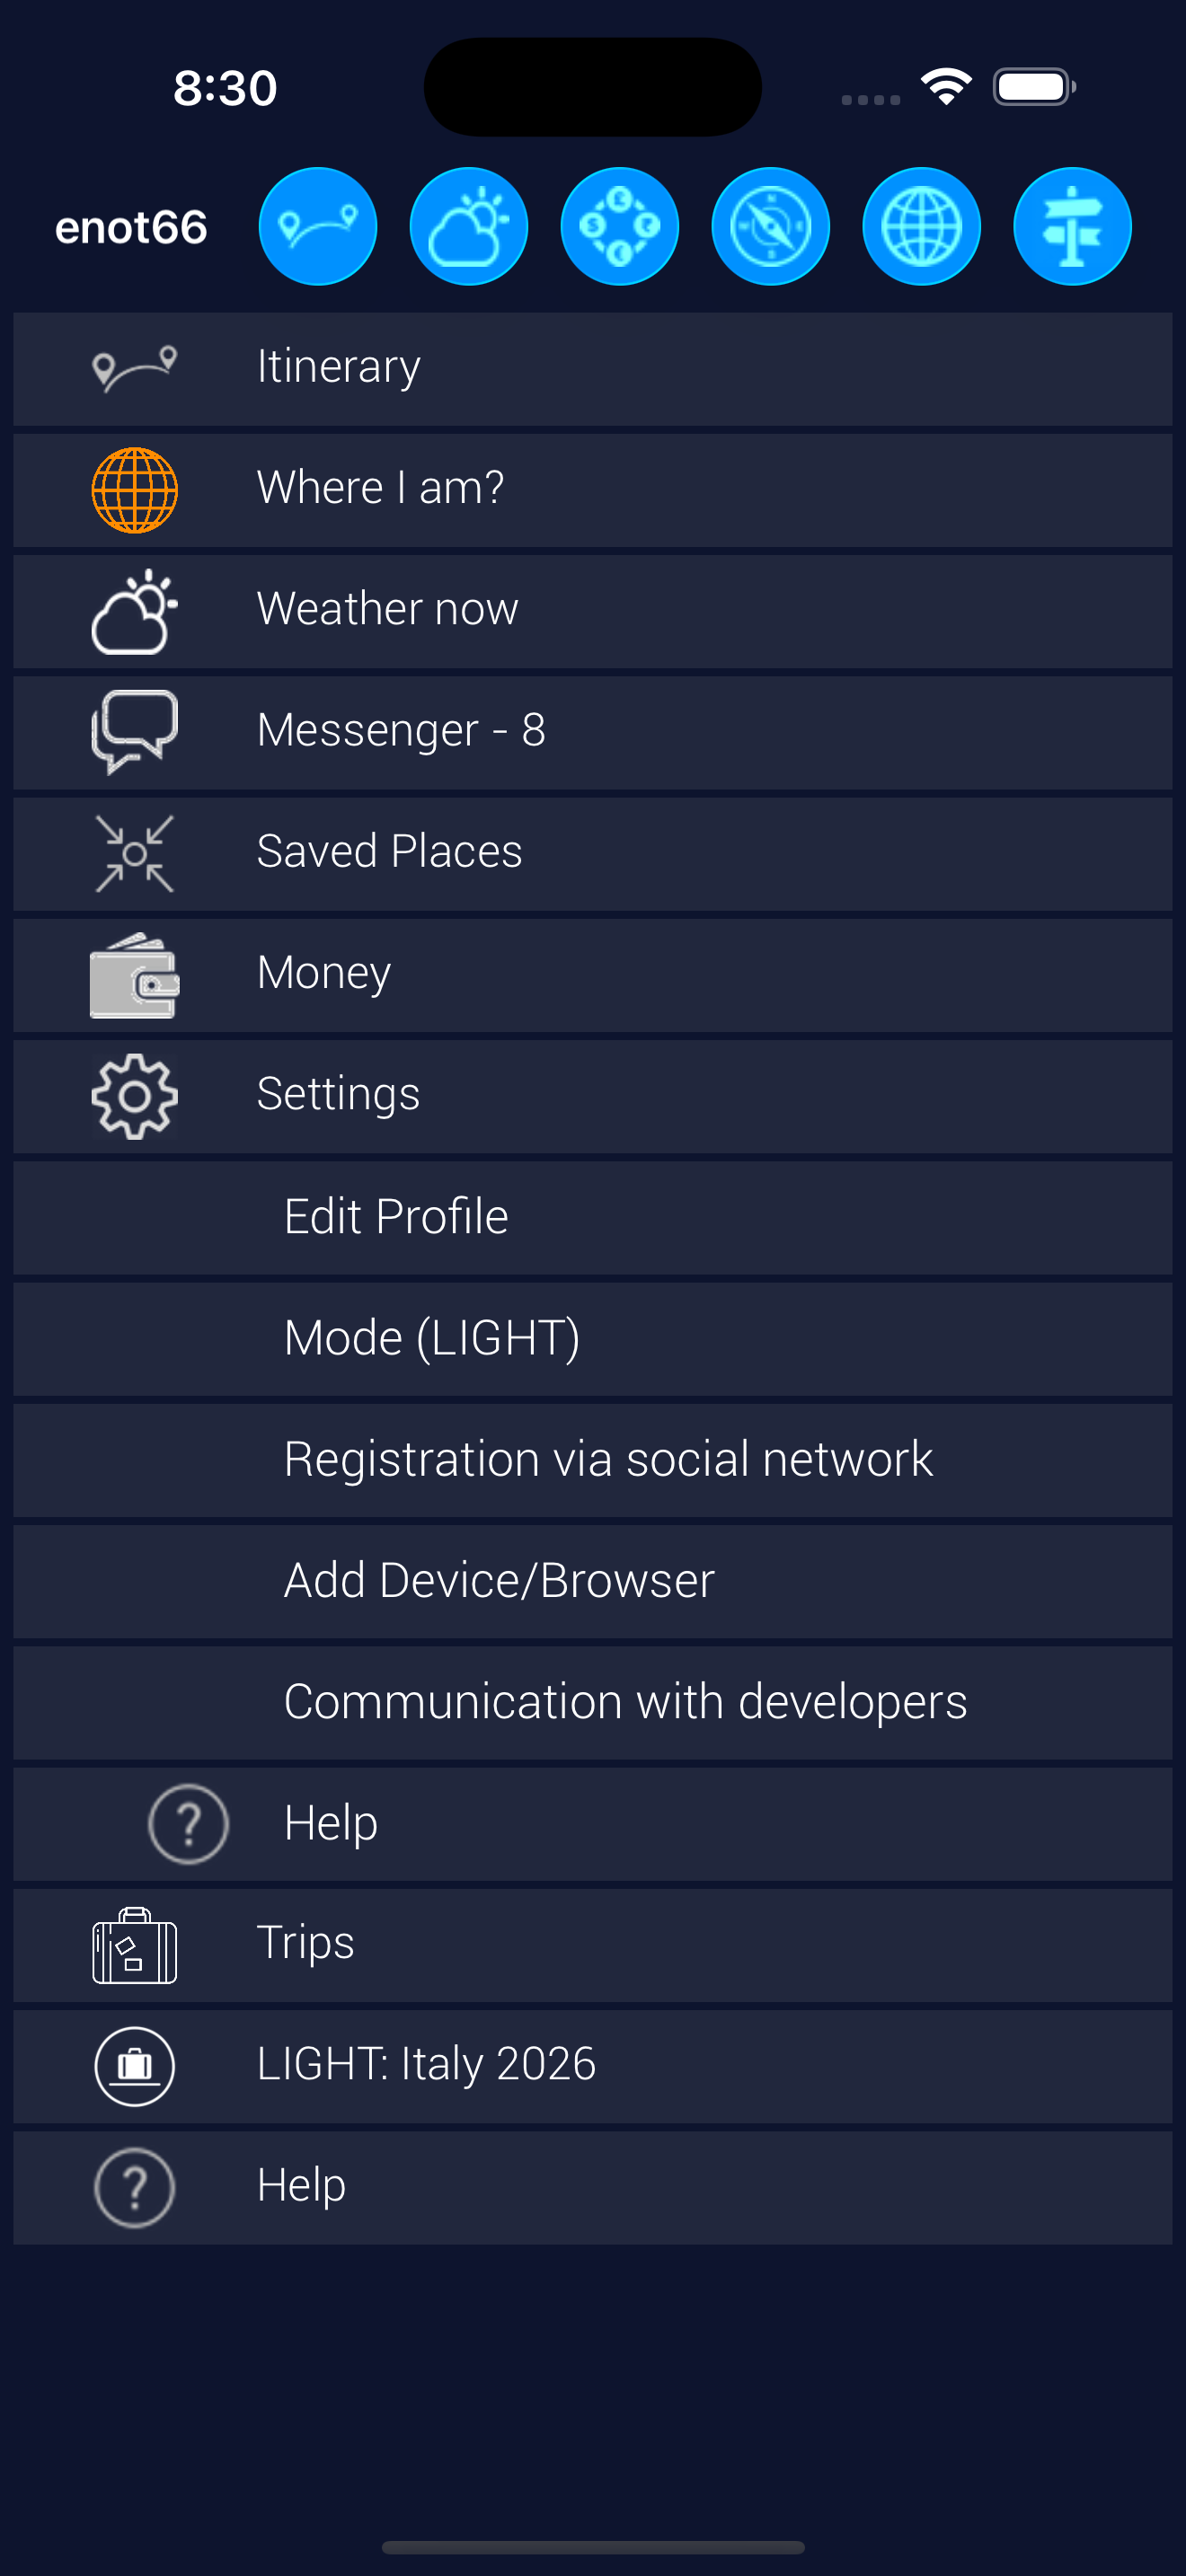
You can change your name, avatar, app language, and measurement system.
You can switch between app operation modes - Light or Pro.
If you have an anonymous account, you can register at any time through an Apple or Google account. In this case, you can access your account from any device or browser.
If you have an anonymous account, you can connect another device or browser to your account without registering with Apple or Google.
You can write to us about what you don't like or what needs to be added.
Pro mode
The PRO app operation mode adds the ability to plan your trip.
Part of the main screen in Pro mode
After switching to PRO mode, a "Trip planning" item will appear in the main menu. If you open it, you will see the planning menu - flights, accommodations, car rentals, etc.
Planning screen
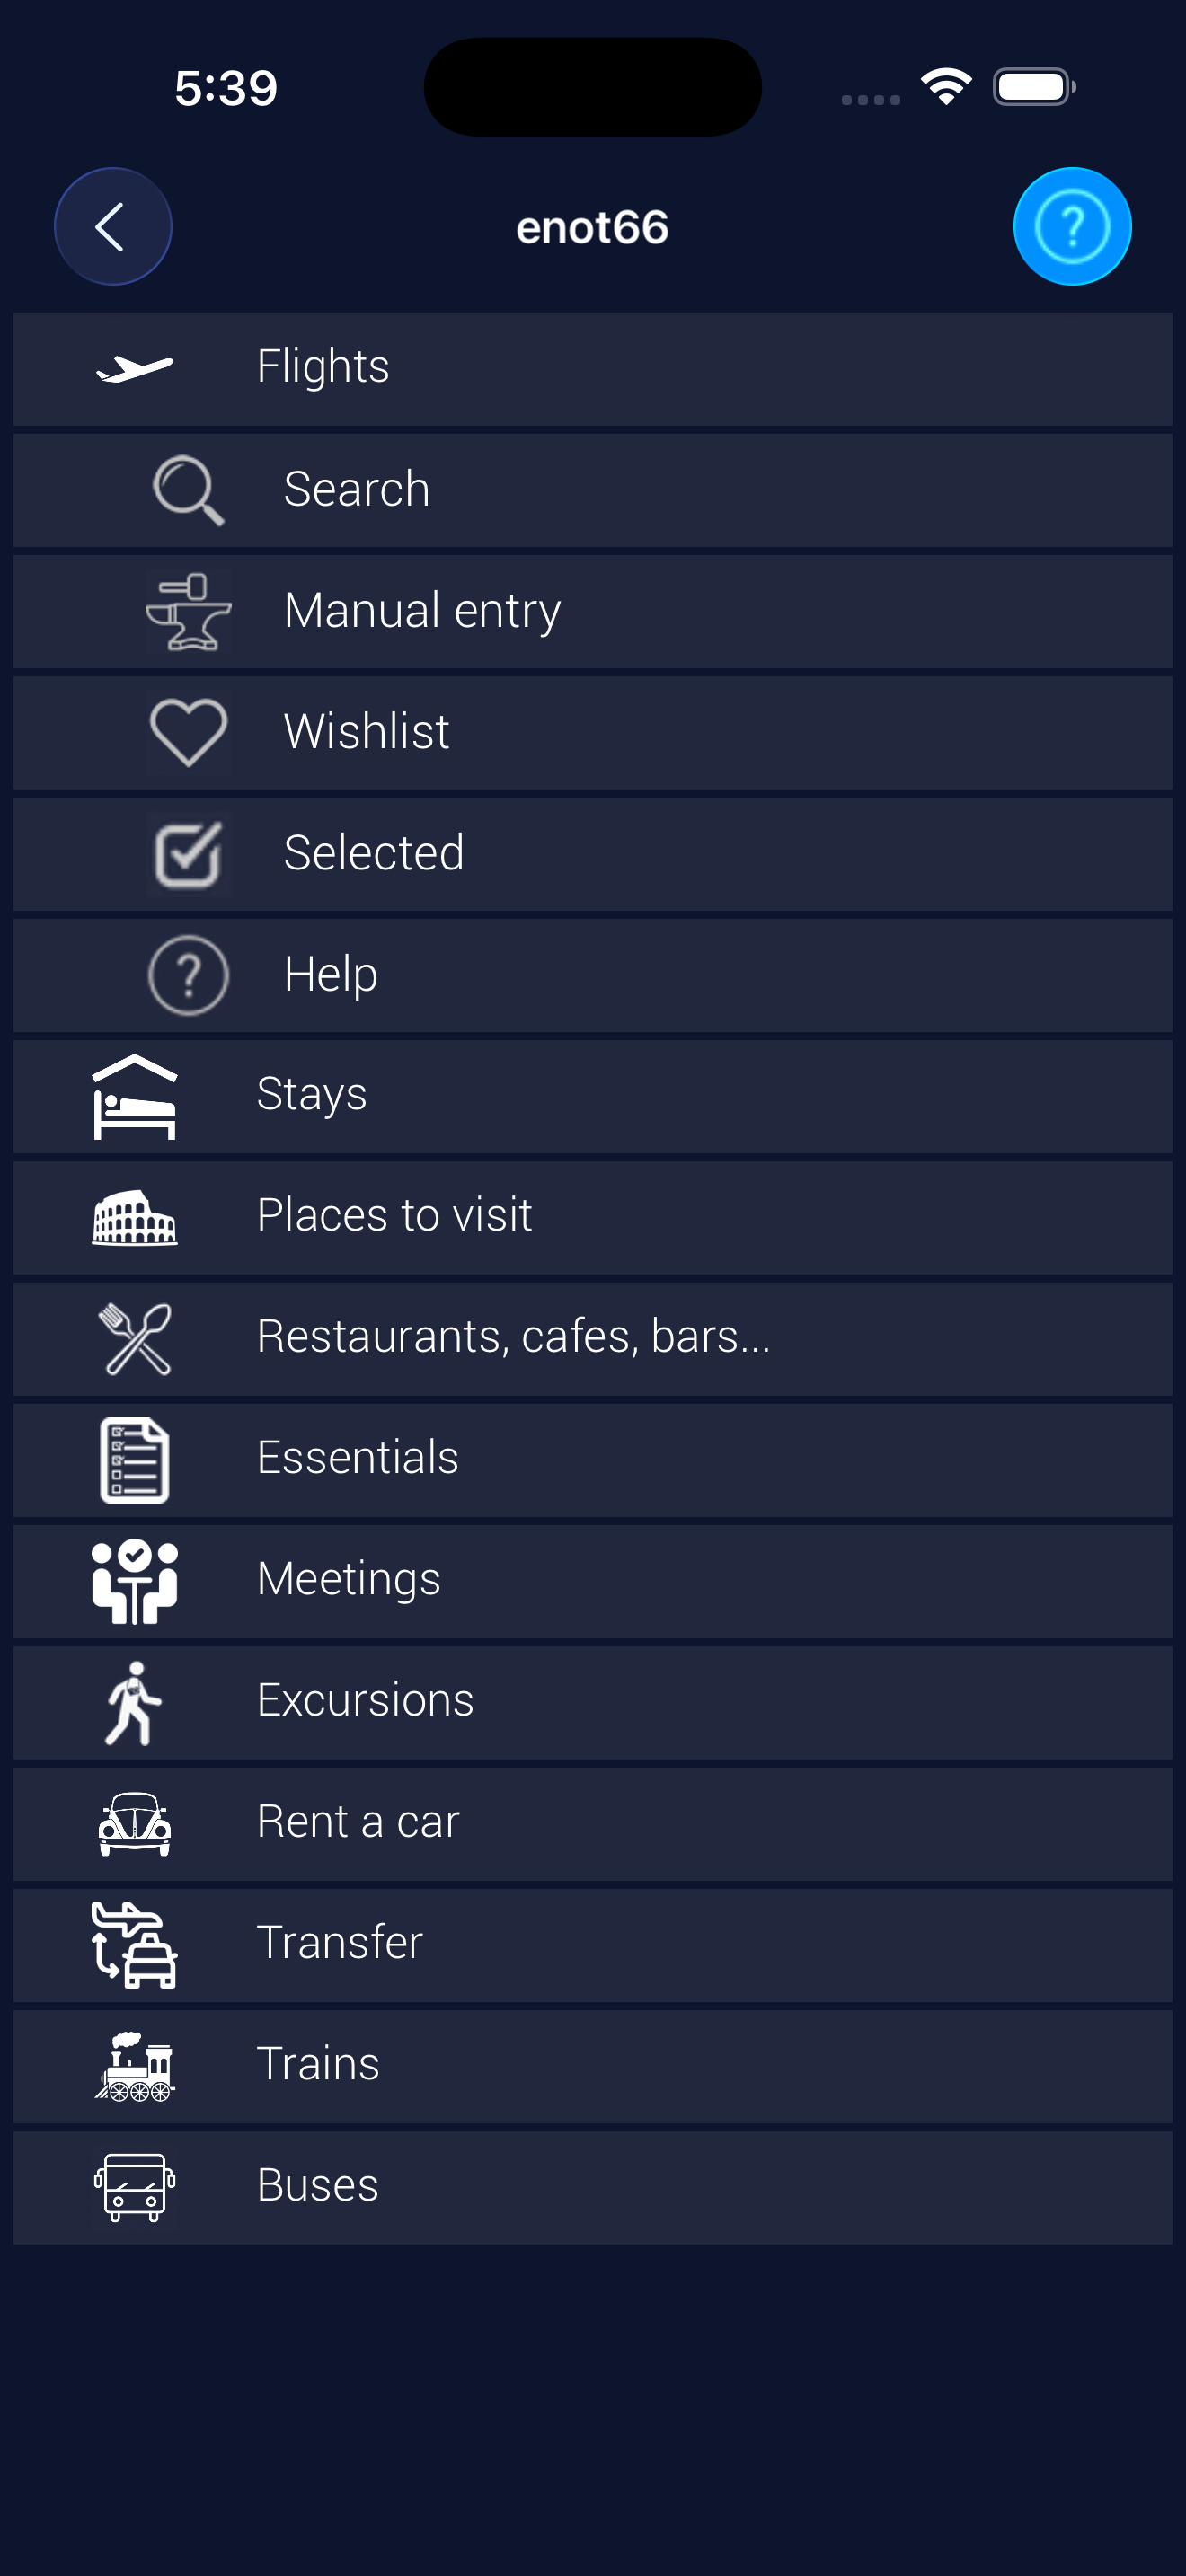
Each menu item has a submenu:
- Search
- Manual entry
- Wishlist
- Selected
Planning algorithm:
- Search for objects in the search (or add them manually).
- Move the objects you like to the "Wishlist".
- Discuss and consider the objects moved to the "Wishlist".
- Move the objects chosen after consideration and discussion to "Selected".
- Get the travel plan.
Explanation of Light mode in Pro mode terms - in Light mode, we add objects manually, and they go directly to "Selected".
Search
Let's look at how it works using accommodations as an example - hotels, guesthouses, villas, etc. You can search for accommodations using the built-in search system.
The search looks roughly the same as on any search website, for example, booking.com, with one exception - all queries are saved along with their filters and sorting options.
For example, you entered the query parameters once - search near the city of Brampton, accommodation types - villas, guesthouses, country houses, from the 23rd to the 18th of February, 1 adult, sort by price.
Now the search has this query, so tomorrow you can simply select it from the list, enot66 remembered all the parameters.
Searches are grouped by major cities to avoid confusion, so that searches around Rome and Toronto are separated.
If you change any query parameter (not a filter or sorting) - for example, Rome instead of Brampton, or change the dates, or the number of guests, enot66 will create a new query, which will also appear in the list.
You can use a query created by another trip participant.
The result of the query is a list of accommodations matching the search criteria. For each hotel, you can view the description, photos, map, etc. This is the standard object description menu that you have already seen in LIGHT mode.
If you like, for example, a hotel, you can move it to the "Wishlist" (from the object description menu - the items "Move to Wishlist" and "Move to Selected" will appear there).
Please note that any objects (except flights) can be searched near another travel object that is in the "Wishlist" or "Selected".
For example, you already have a place you need to visit. You can search for, say, hotels around that place.
To do this, in the search form you need to select "Search by trip object". On the screen that appears (this is actually "Routes"), select the object you need.
You can search for restaurants around an object in the same way. This is the same as explained for LIGHT mode (searching for a restaurant around place #1), but using a different method.
Wishlist
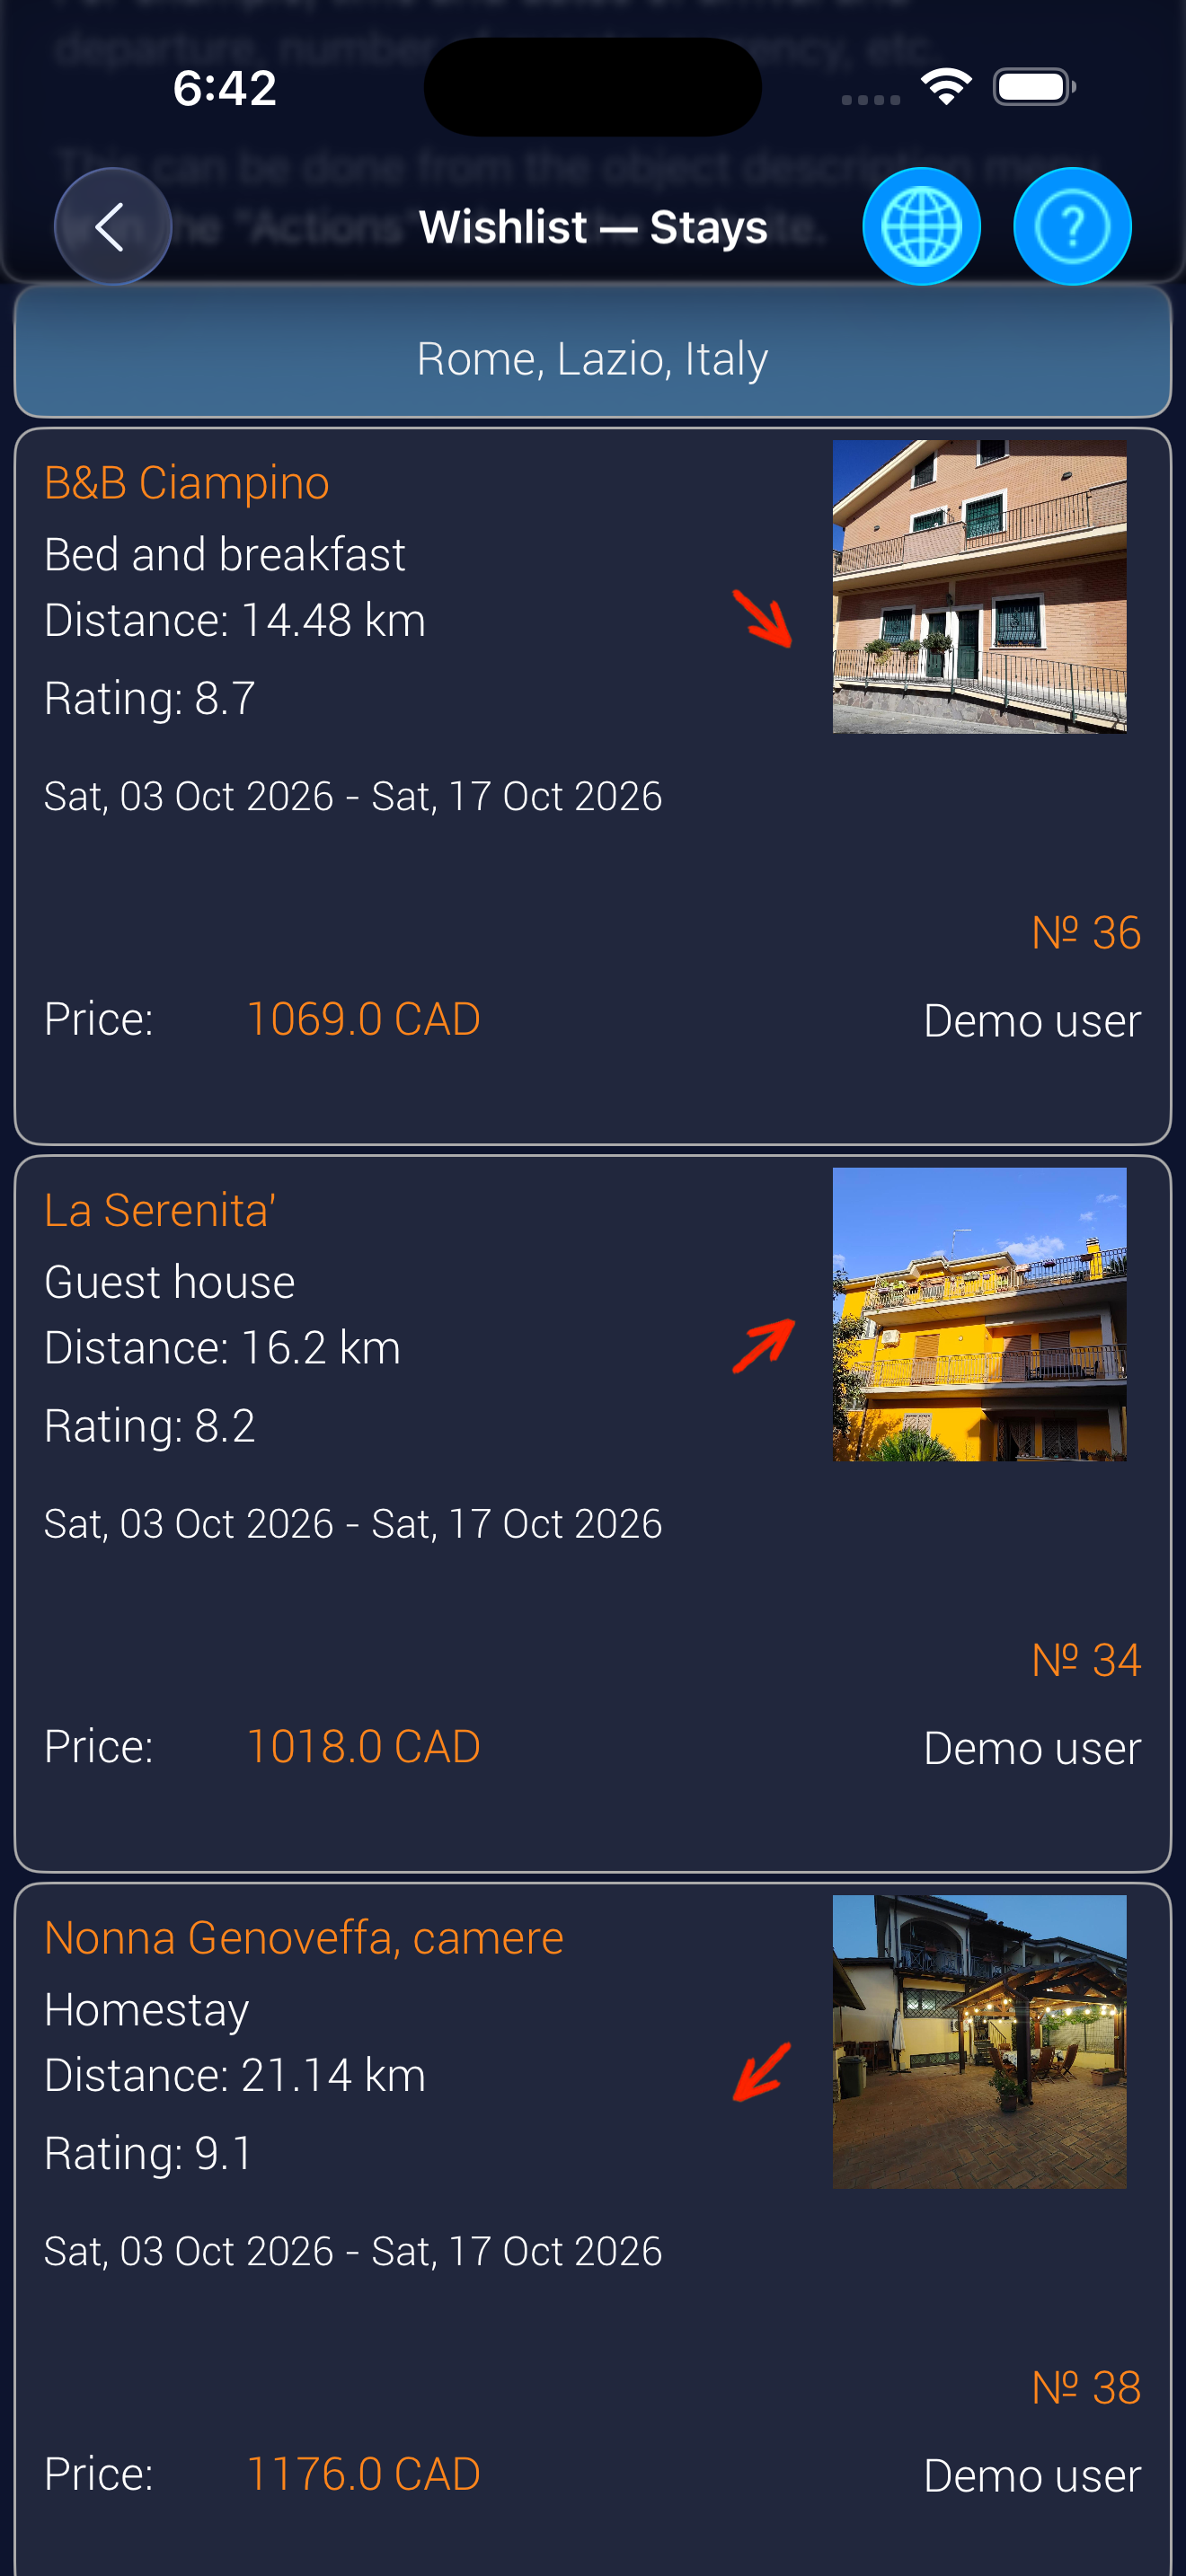
This is a list of objects of one type (in our example - accommodations) that the trip participants liked but haven't booked yet.
Usually, we save travel objects we like somewhere, for example, in browser bookmarks. Or we send them to each other in a messenger. If that's even possible - in mobile apps, there may be no way to save an object.
The "Wishlist" solves this problem - all trip participants see all liked objects of one type in a single list (for example: "Trip planning" - "Accommodations" - "Wishlist").
You can discuss objects with other trip participants or think about them on your own.
Objects chosen for the trip (in this case, a hotel) can be moved to "Selected" (from the travel object description menu).
Objects chosen for the trip (in this case, a hotel) can be moved to "Selected" (from the travel object description menu).
Objects chosen for the trip (in this case, a hotel) can be moved to "Selected" (from the travel object description menu).
In the travel object menu, there is one more item that was not described in the Light version.
This is a built-in messenger. The app automatically creates a chat for each object moved to the "Wishlist" or "Selected". In PRO mode, you can discuss this travel object. Everyone's opinion will be in one place and accessible to all.
If you discuss an object outside the app, pay attention to the numbers on the objects. In the example, you can see 26, 30, and 20.
These are numbers assigned to an object when it is moved to the "Wishlist" or "Selected".
Such a number is never repeated within one trip. Therefore, instead of writing the hotel name, restaurant name, or somehow describing a flight to another trip participant, you can just say - hotel 30. This uniquely identifies the object in the app.
Selected
These are objects that you have booked (for example, a flight) or chosen to visit (for example, a restaurant, attraction). It looks the same as the "Wishlist".
The travel plan is automatically generated from the objects moved to "Selected".
In LIGHT mode, you were adding objects manually to the "Plan". In reality, you were adding them to "Selected".
Manual entry
This is the only way to add travel objects in LIGHT mode and one of the ways in PRO mode.
These are objects that you have already booked, so there's no point in searching for them.
Or these are objects that you cannot find in the search (for example, "Meetings").
Or these are objects that you found somewhere else. For example, you already know the name of the attraction you want to visit. So it's more convenient to add it by name.
Unlike Light mode, in PRO mode manually entered objects go to the "Wishlist", not to the "Plan" (i.e., "Selected").
Summary
PRO mode allows planning and considering travel objects both individually and as a group.
The workflow is very simple:
- Search for objects in the search (or add them manually).
- Move the objects you like to the "Wishlist".
- Discuss and consider the objects moved to the "Wishlist".
- Move the objects chosen after consideration and discussion to "Selected".
- Get the travel plan.
Mobile apps
- Mobile apps contain full functionality - planning and trip assistance.
- Both mobile apps and the web application do not require registration (although you can register through a Google or Apple account).
- Anonymous login allows you to access your account from other mobile devices or browsers.
- If you lose access to your anonymous account on all mobile devices and all browsers, it will be impossible to recover access to the anonymous account.

Web
- The web application (website) is not designed for mobile devices; for mobile devices, please use the Apple or Android app.
- The web application (website) contains only planning functionality.
- Both mobile apps and the web application do not require registration (although you can register through a Google or Apple account).
- Anonymous login allows you to access your account from other mobile devices or browsers.
- If you lose access to your anonymous account on all mobile devices and all browsers, it will be impossible to recover access to the anonymous account.